The Raspberry Pi is a family of low-cost, single-board computers developed by the Raspberry Pi Foundation in the U.K. Since its introduction in 2012, it has emerged as a widely-used platform for embedded system research and project hobbyists. Most users use some form of the Linux operating system on the Raspberry Pi; equipped with several USB ports, quad-core processor, an IEEE 802.3/Ethernet port, IEEE 802.11 WiFi and Bluetooth capability, HDMI connector, audio output, and a general-purpose input/output (GPIO) bus, it is a very powerful tool for research, exploration, teaching, and learning.
There are many documents on the Internet that describe various aspects of using a Raspberry Pi to create a marine Automatic Identification System (AIS) display. While I don't want to repeat all of those sites — and, hopefully, I won't — I wanted to put everything into one place, particularly for other AIS researchers who are looking for a push up the learning curve. I hope that this page accomplishes that goal.
For purposes of this paper, I am assuming that readers understand the fundamentals of AIS. To get a lot more information, check out the USCG Navigation Center's Automatic Identification System Overview, IALA's An Overview of AIS (Edition 2), or the automatic identification system (AIS) article at Wikipedia.
For your viewing pleasure, see my Build A Raspberry AIS talk from Hack The Sea 2.0 at DEF CON 28 (2020).
Also, check out the following blog postings by my friend and colleague, Rae Baker: Creating an AIS Pi for Maritime Research and How to Install OpenCPN on Your AIS Raspberry Pi for Maritime Research.
Table of Contents
Unless specifically noted otherwise, no endorsement of hardware, software, or other items is intended in the discussion below.
Hardware
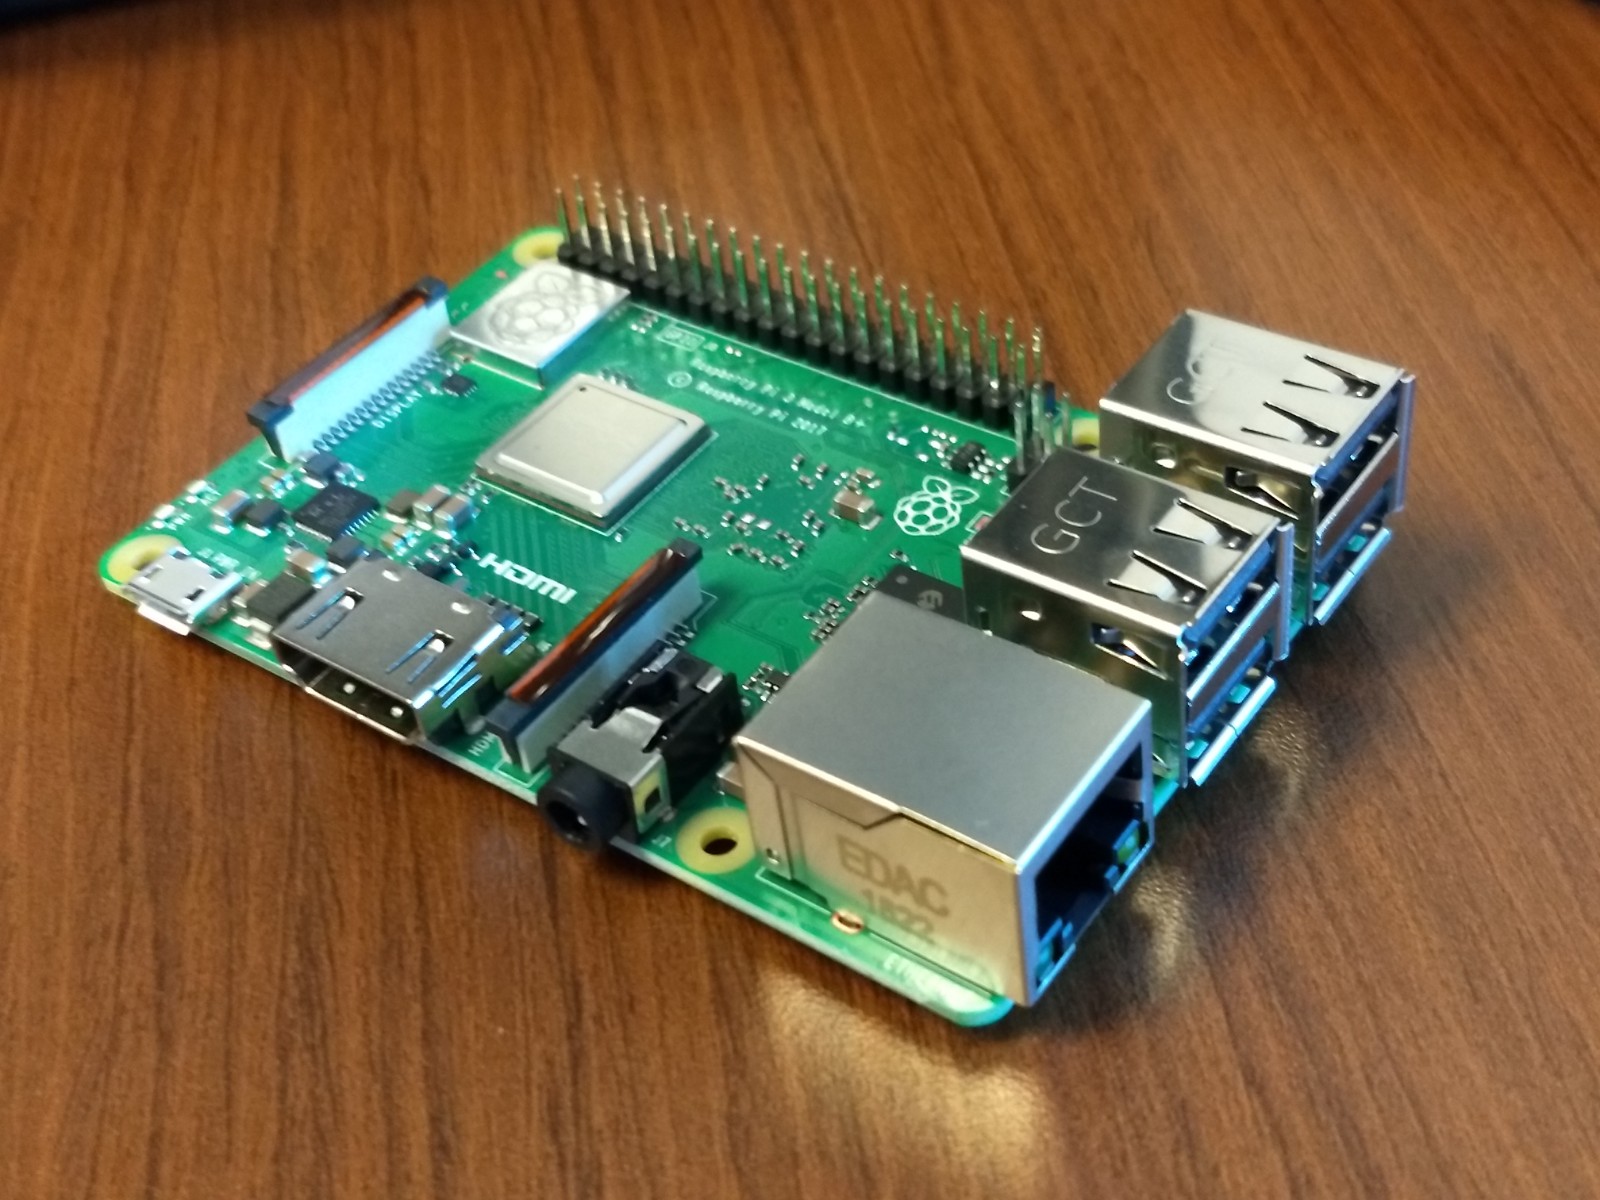
Raspberry Pi: Essential hardware, obviously, since this is the title of the paper! There are many sources and I leave that to the reader. Be sure to get the latest version of the hardware. (The information on this page has been tested, and is running, on a Raspberry Pi 3 Model B+. Everything should still work on the current version of the hardware, the Raspberry Pi 4.)
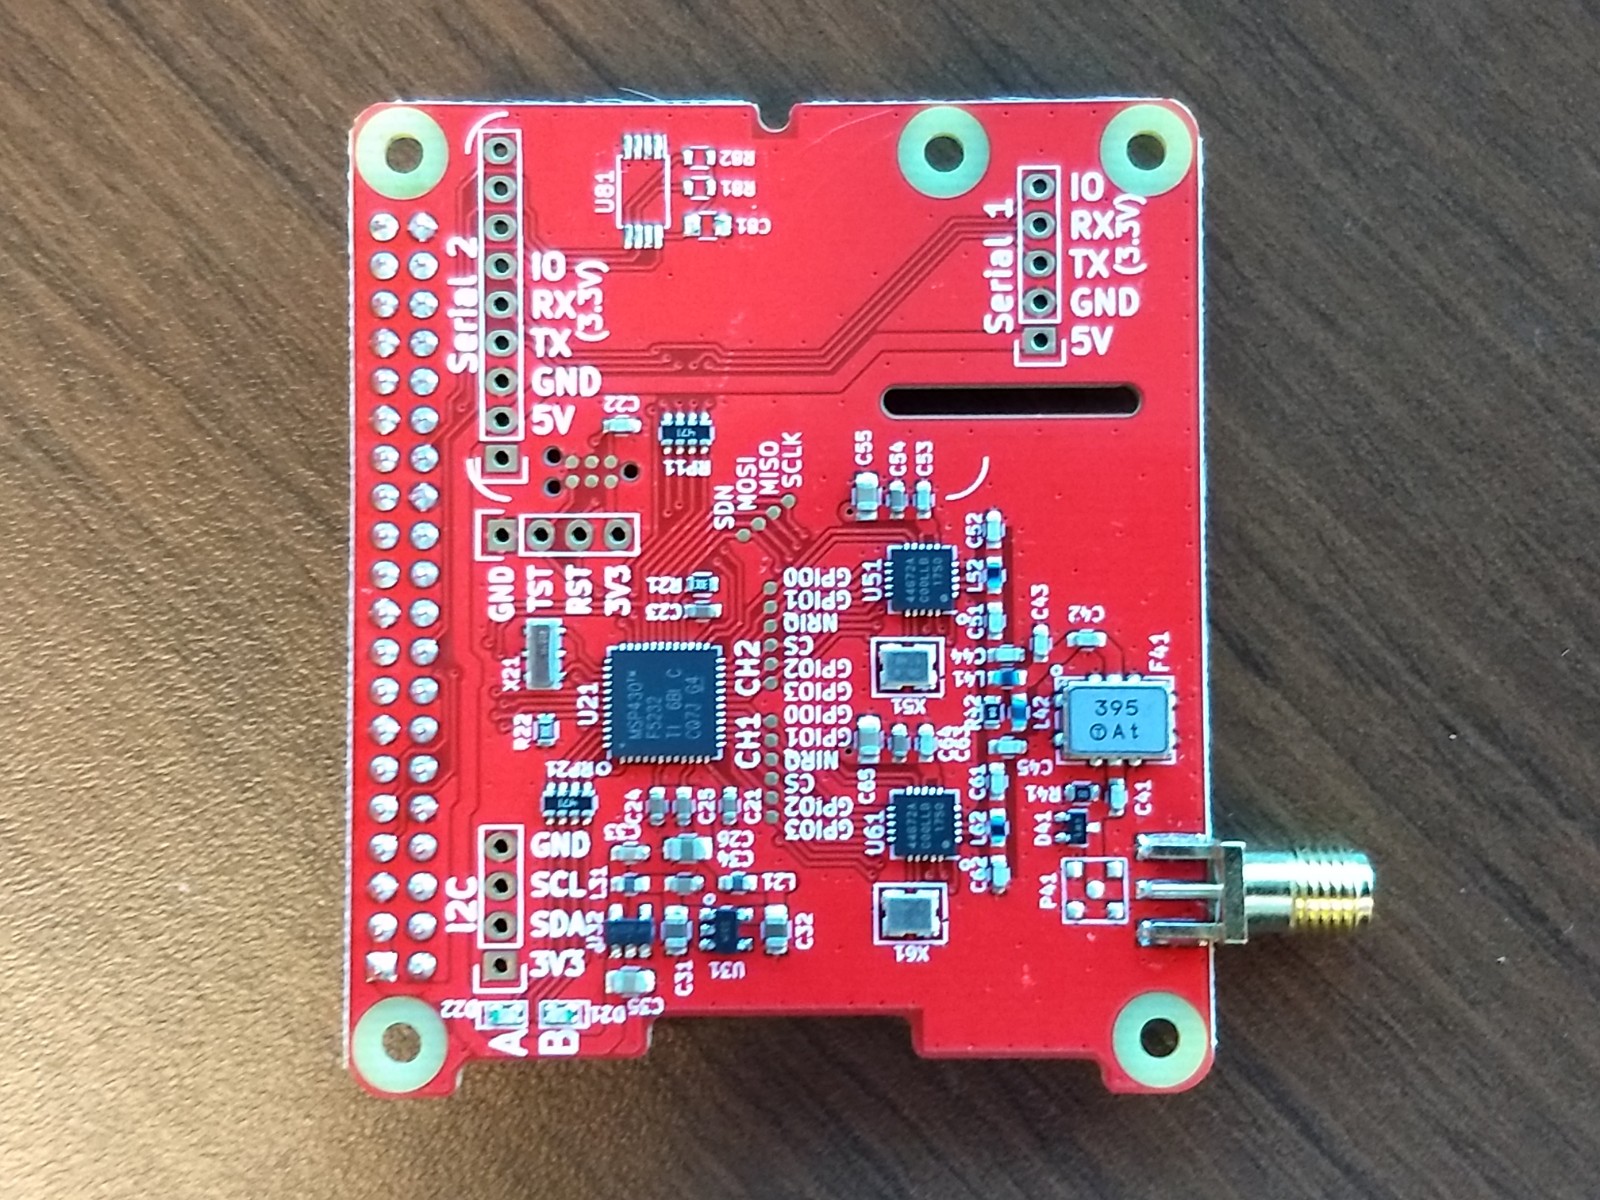
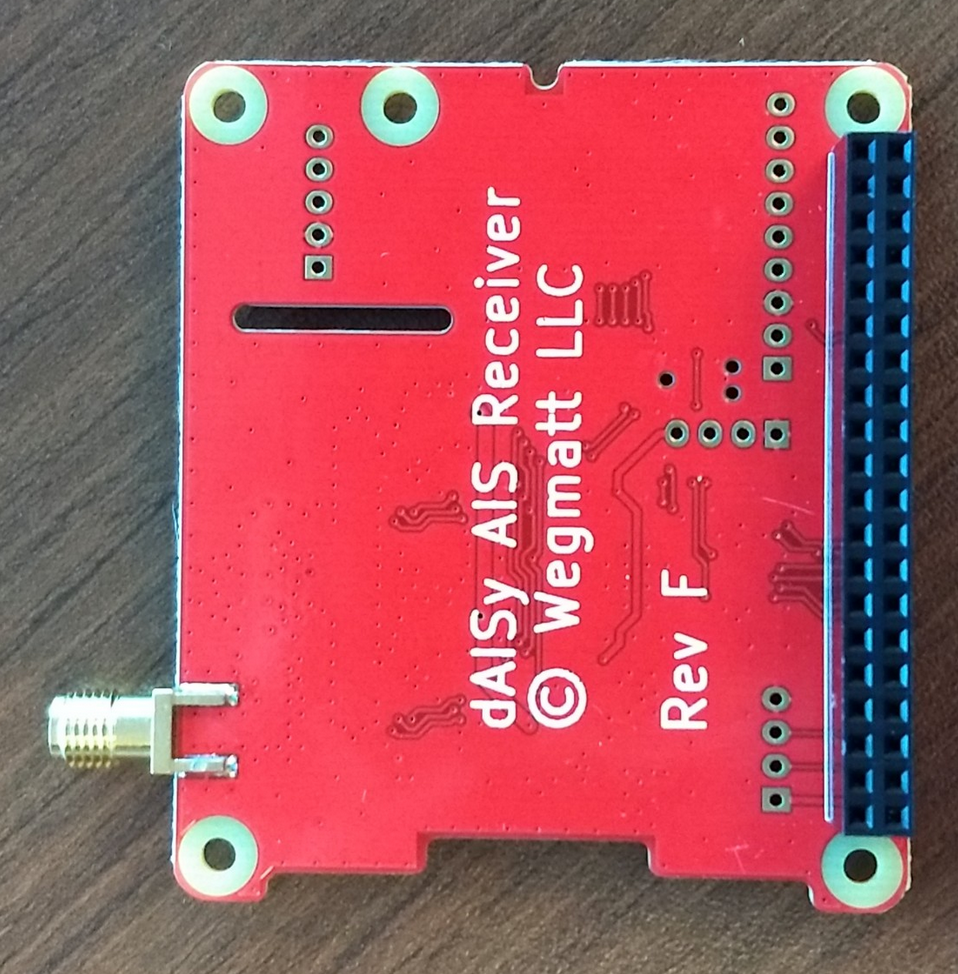
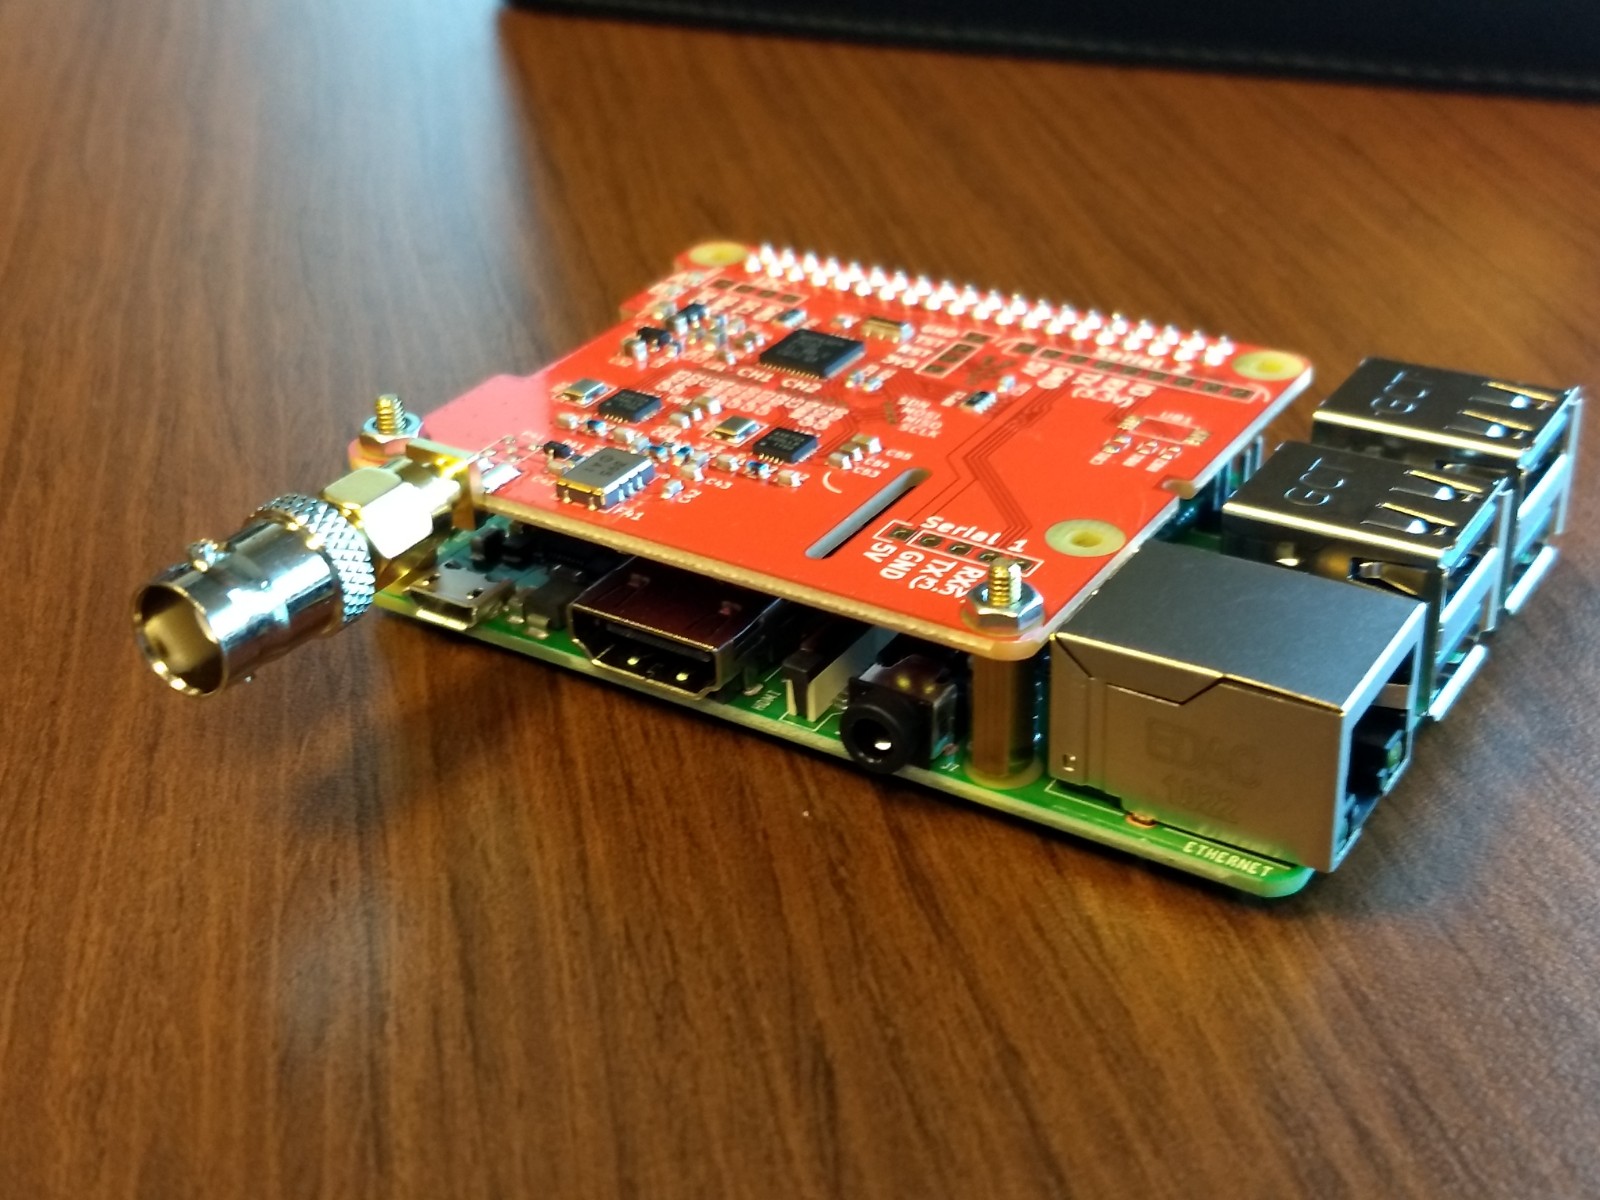
dAISy Hat AIS Receiver: If you are doing AIS projects, you will need some type of AIS receiver. There are a number of options; one way is to get an external receiver and connect it to the Raspberry Pi's USB port. My suggestion is the dAISy Hat 2-channel AIS receiver, a daughterboard for the Raspberry Pi. Designed by Wegmatt, the primary source is Tindie.
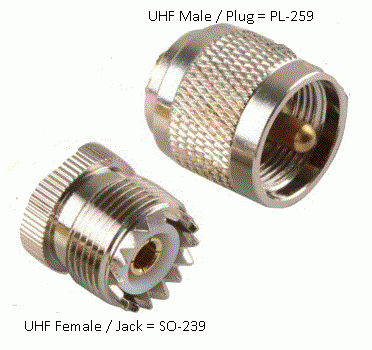
- NOTE: If you use an antenna for your dAISy Hat, note the terminating connector. If it comes with a male BNC plug, it should attach directly to the dAISy Hat's female BNC jack. If it comes with a coaxial cable, it most likely terminates with a male PL-259/SO-239 plug, thus, you will need an adapter. I would recommend getting the SO-239 pigtail or BNC-to-SO-239 adapter when you buy the dAISy Hat.
- A note on antenna connector nomenclature: According to most sources that I can find, references to SO-239 and PL-259 are mated connector pairs for coaxial cable terminations. In general, the SO-239 (aka UHF Female or UHF Jack) is the connector on a radio or chassis and the PL-259 (aka UHF Male or UHF Plug) is the connector on a cable. You may also find a "male SO-239" or a "female PL-259" product listings. Be sure to look at the pictures!
µSD card: The operating system, all files, and on-board storage for the Raspberry Pi reside on a single microSD card. Ideally, get a card with a capacity of 32 GB or 64 GB. Most microSD cards come with an adapter so that they can fit into a computer's SD card slot. If you don't have such a card slot, you might also need to obtain a µSD/SD-to-USB reader.
Case (optional): Although it is not absolutely necessary to have a case, I would recommend getting the case that comes with the dAISy Hat in order to protect all of the components when everything is in use.
Other hardware (optional): In order to initially configure the Raspberry Pi, you might also want to have on hand an HDMI-capable monitor, an HDMI cable, and a wireless/USB keyboard and mouse. You should also have an Ethernet cable and router for a network connection or an open WiFi network.
Antenna (optional): You will need an antenna if you wish to pick up AIS signals from the outside. AIS uses two VHF maritime frequencies, 161.975 MHz and 162.025 MHz. Any antenna that can work in these frequencies — or is labelled "VHF marine antenna" — ought to work fine for AIS projects. As noted above, be sure to check out the antenna cable connector.
Installing Raspberry Pi OS
Before going any further, I would like you to be aware of an entirely different direction you can take. AISHub offers rPiAIS, an implementation of AIS Dispatcher for the Raspberry Pi. Depending upon what you're trying to do, rPiAIS might be worth looking into.
There are several lightweight Linux (and other) operating systems that can run on the Raspberry Pi. The native OS is Raspberry Pi OS (nee Raspian), a variant of Debian. The best source for all of these is the Raspberry Pi Foundation's Software page, and follow the instructions.
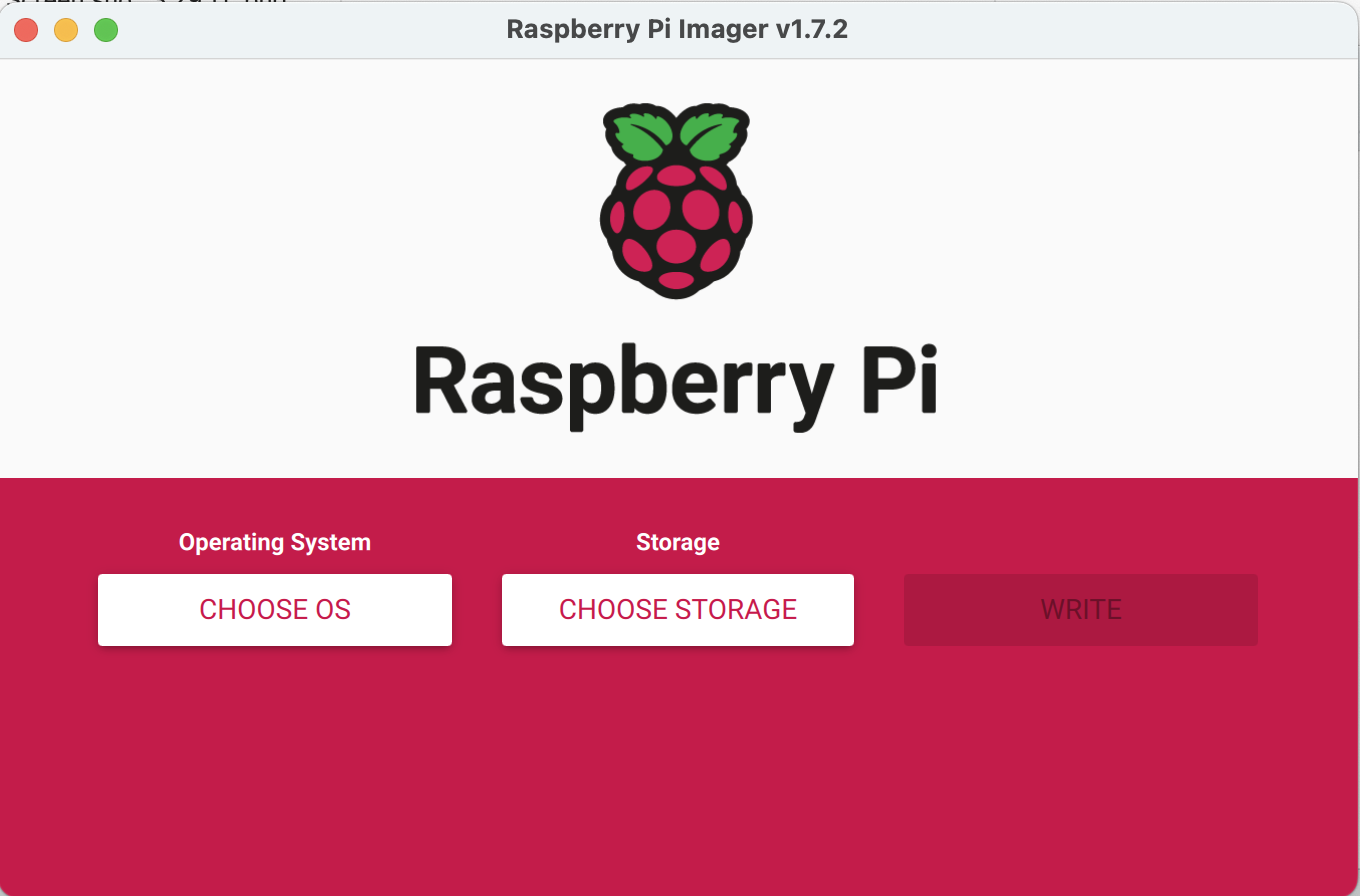
- Download and install the Raspberry Pi Imager.
- (Optional) Watch the 45-second installation video.
- Attach a microSD card to your computer.
- Execute the Raspberry Pi Imager application:
- Click the CHOOSE OS button to select the OS to install. You probably want Raspberry Pi OS (32-bit).
- (Optional but highly recommended) Press CTRL+SHIFT+X to preconfigure the OS. At this point, set the hostname, enable SSH (not required, but recommended), set the username and password, enable WiFi (be sure to properly set the country), and set locale information.
- Click the CHOOSE STORAGE button to select the SD card on which to install the OS. You probably want Generic MassStorageClass Media.
- Click the WRITE button to write and verify the image on the microSD card.
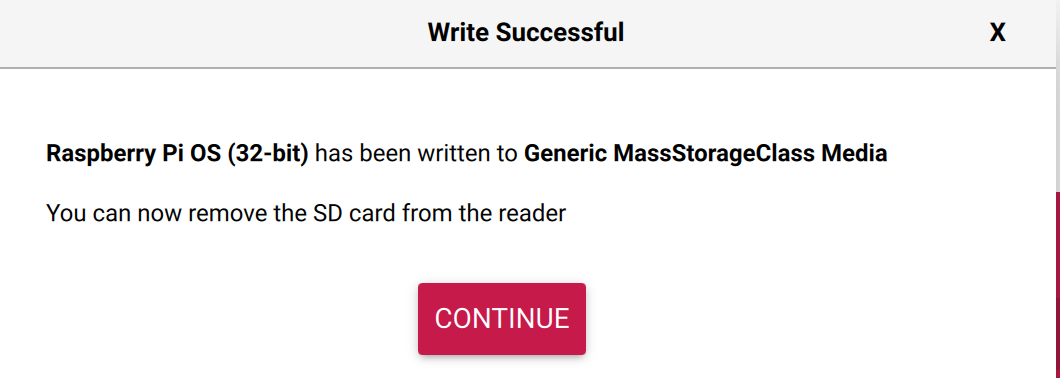
- The OS is installed when you see the message above. Click CONTINUE.
- Exit the Raspberry Pi Imager application.
Configuring the Raspberry Pi
You're now ready to get the Raspberry Pi running! For additional information on this phase, see the Getting started with Raspberry Pi page.
- Insert the microSD card into the Raspberry Pi's SD card slot, attach your I/O devices (i.e., keyboard/mouse/monitor), and power it up.
- You should see a red LED light up on the Raspberry Pi; this indicates that it is booting. It might take a few minutes, but you will soon see what appears to be a Linux-like desktop!
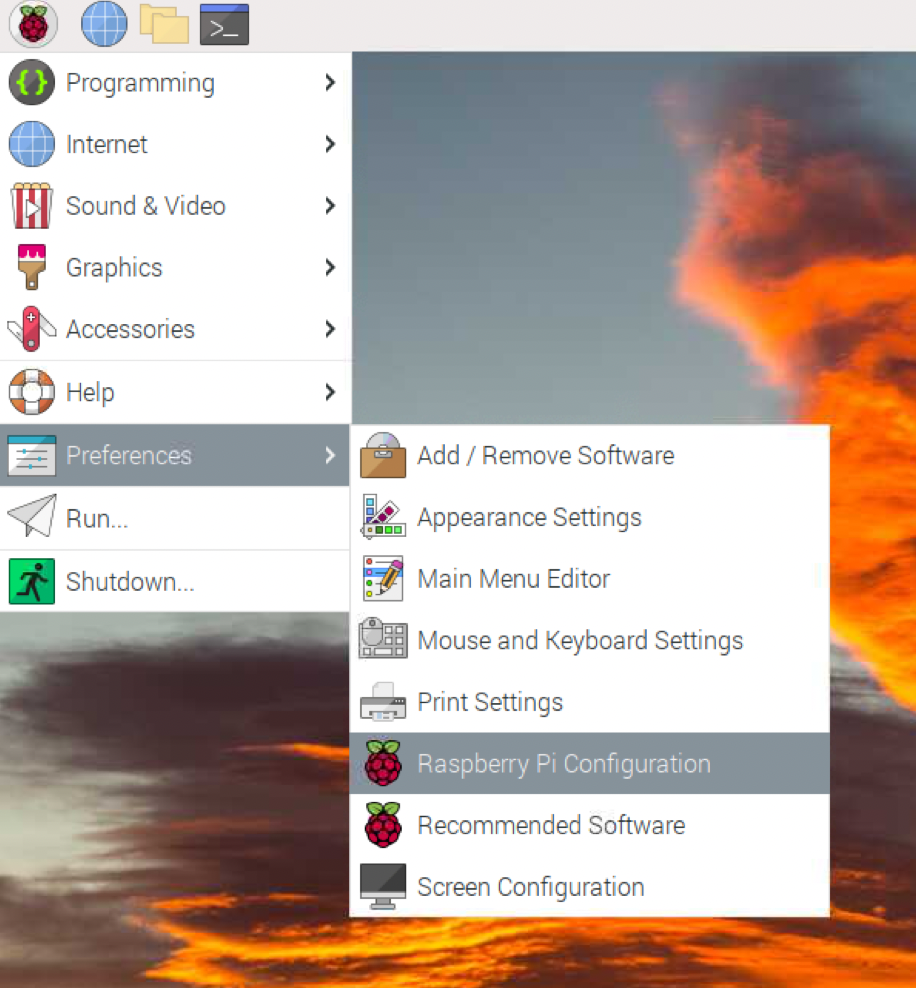
- Enter the configuration menu by clicking on the Raspberry icon
 in the upper left of the screen, and then select Preferences, Raspberry Pi Configuration:
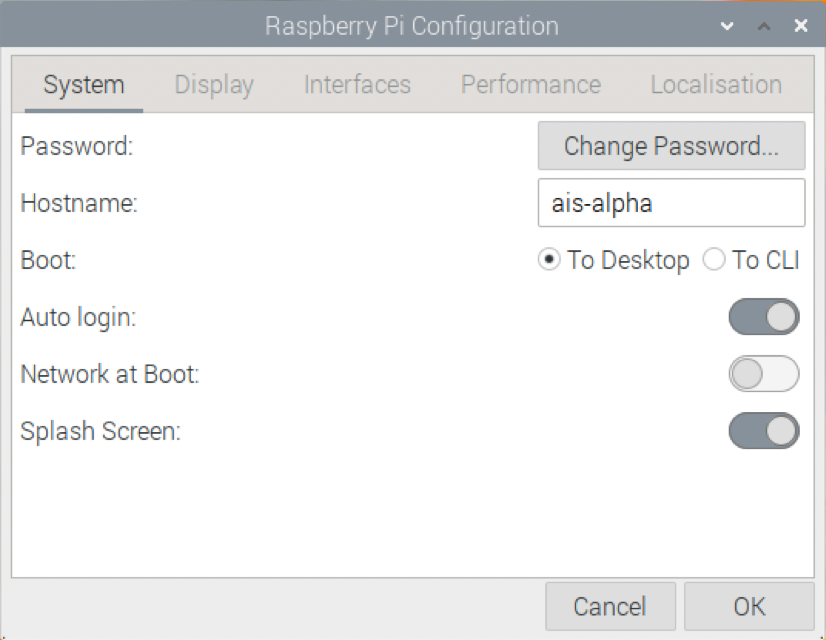
- If you entered configuration information above during the microSD card imaging process, your Raspberry Pi is already mostly configured (except missing a couple of essential elements, discussed below). You should step through the configuration tabs to ensure that what you want is there. This is also the place to enter any missing information or change information later.
- The System tab shows the system's Hostname. This is also where you can Change Password, direct the boot process to the desktop or command line interface (CLI), set the automatic login option, and more.
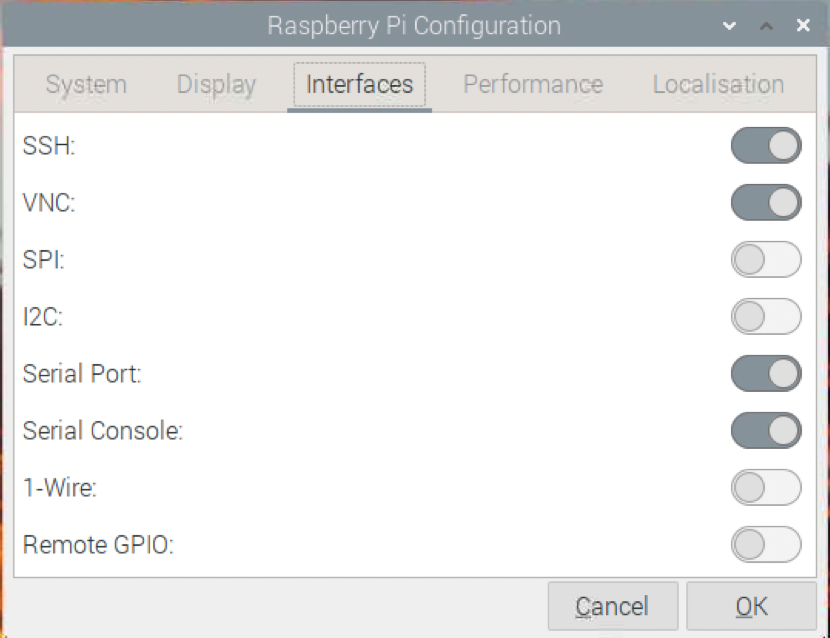
- You will need to make some changes on the Interfaces tab:
- Be sure that the Serial Port slider is set
- If you enabled SSH in the imaging process, confirm that the SSH slider is set. You should probably also enable VNC to allow remote login to the desktop. [NOTE: You might need to engage port forwarding and/or make other changes to your firewall to allow SSH/VNC traffic into your network. SSH uses TCP port 22 and VNC uses TCP port 5900.]
- If SSH is enabled, you can also easily get FTP access to the device using any FTP client that supports SSH File Transfer Protocol (SFTP). [Do not confuse SFTP with FTPS; the latter is FTP over SSL/TLS.]
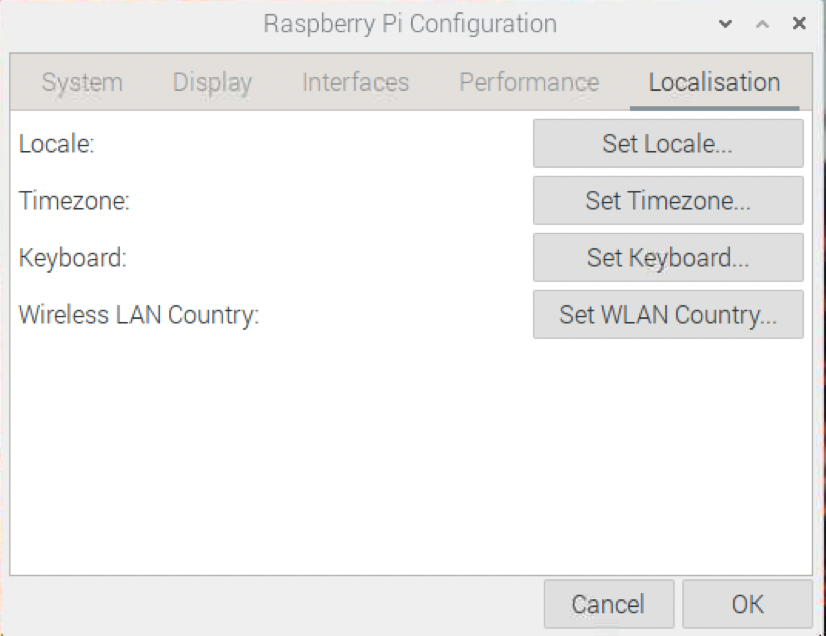
- Information on the Localisation tab should be mostly set if you entered information during the imaging process:
- Set your language and country by clicking the Set Locale... button. This information was not provided during the imaging process so enter it here.
- Set your time zone area and location by clicking the Set Timezone... button.
- Set the keyboard model and layout by clicking the Set Keyboard... button.
- If you intend to use WiFi, click the Set WiFi Country... button to select a country.
- When the configuration looks ok, click OK. You'll be asked if you want to reboot; click the "Yes" button.
You can perform the same functions from the command line by opening a terminal window and entering:
sudo raspi-config
Additional information on using the command line configuration utility can be found at the Raspberry Pi Foundation's raspi-config page.
Once you've set a WiFi country, the Raspberry Pi should automatically find any available WiFi network that is broadcasting its SSID if a network cable is not physically attached. If you want to connect to any WiFi network that doesn't broadcast an SSID, you will need to edit the /etc/wpa_supplicant/wpa_supplicant.conf file in order to add the hidden network information. Note that WiFi information is already configured if you entered a network name during the microSD card imaging process, above. The paragraphs below provide information that you might need in order to change WiFi network settings or better understand the contents of the wpa_supplicant.conf file.
What follows is an example of how you might configure the wpa_supplicant.conf file if you have two WiFi networks, namely, a non-broadcast SSID "Guest" network that requires no password and a non-broadcast SSID "Owner" network with the password "Secret" (using WPA). Open the file by entering the following on the command line (you need to use sudo here because this is a system file):
sudo nano /etc/wpa_supplicant/wpa_supplicant.conf
Now, add the following lines to the config file:
   network={
           scan_ssid=1
           ssid="Guest"
           key_mgmt=NONE}
   network={
           scan_ssid=1
           ssid="Owner"
           psk="Secret"
           key_mgmt=WPA-PSK}
After adding the lines, press control-O (^O) to write the file and ^X to exit. The Raspi will now see the hidden networks as well as any openly advertised networks.
NOTE: Raspberry Pi OS comes with several easy-to-use text editors. nano, referenced above, is a nice command line editor. A GUI text editor can be found by clicking the Raspberry icon, Accessories, and Text Editor.
Finally, a note about screen resolution. If you access the Raspberry Pi strictly via SSH or VNC, it is referred to as a headless connection. Regardless of whether you access remotely or output to an HDMI monitor, if you don't like the screen resolution, you can always change it via the Display tab in the Raspberry Pi Configuration menu. Alternatively, open the /boot/config.txt file with your favorite text editor (be sure to use sudo). Scroll down to find these lines:
# uncomment to force a console size. By default it will be display's size minus
# overscan.
#framebuffer_width=1280
#framebuffer_height=720
Uncomment the two framebuffer commands by removing the leading hash (#). Save the file, reboot, and your screen resolution will be different! You might need to experiment around a bit to find the right size for your monitor.
FINAL NOTE: If you enter configuration information during the microSD card imaging phase, the Raspberry Pi will startup in headless mode. In that case, you might not need an external keyboard, mouse, and monitor to get started. Boot the Raspberry Pi, connect via SSH, run raspi-config from the command line, enable VNC, and reboot. After that, you can connect to the Raspberry Pi's desktop with VNC.
Installing dAISy Hat
Installing the dAISy Hat hardware is very straight-forward. You'll probably want to download the dAISy HAT AIS Receiver Manual for additional reference.
If you have played with computer hardware before, then installing the dAISy Hat daughterboard to the Raspberry Pi's GPIO pins won't be a problem. If you haven't done this before, all I can say is to work slowly, align the socket on the board onto the Raspberry Pi's pins carefully, and press the cards together slowly and evenly.
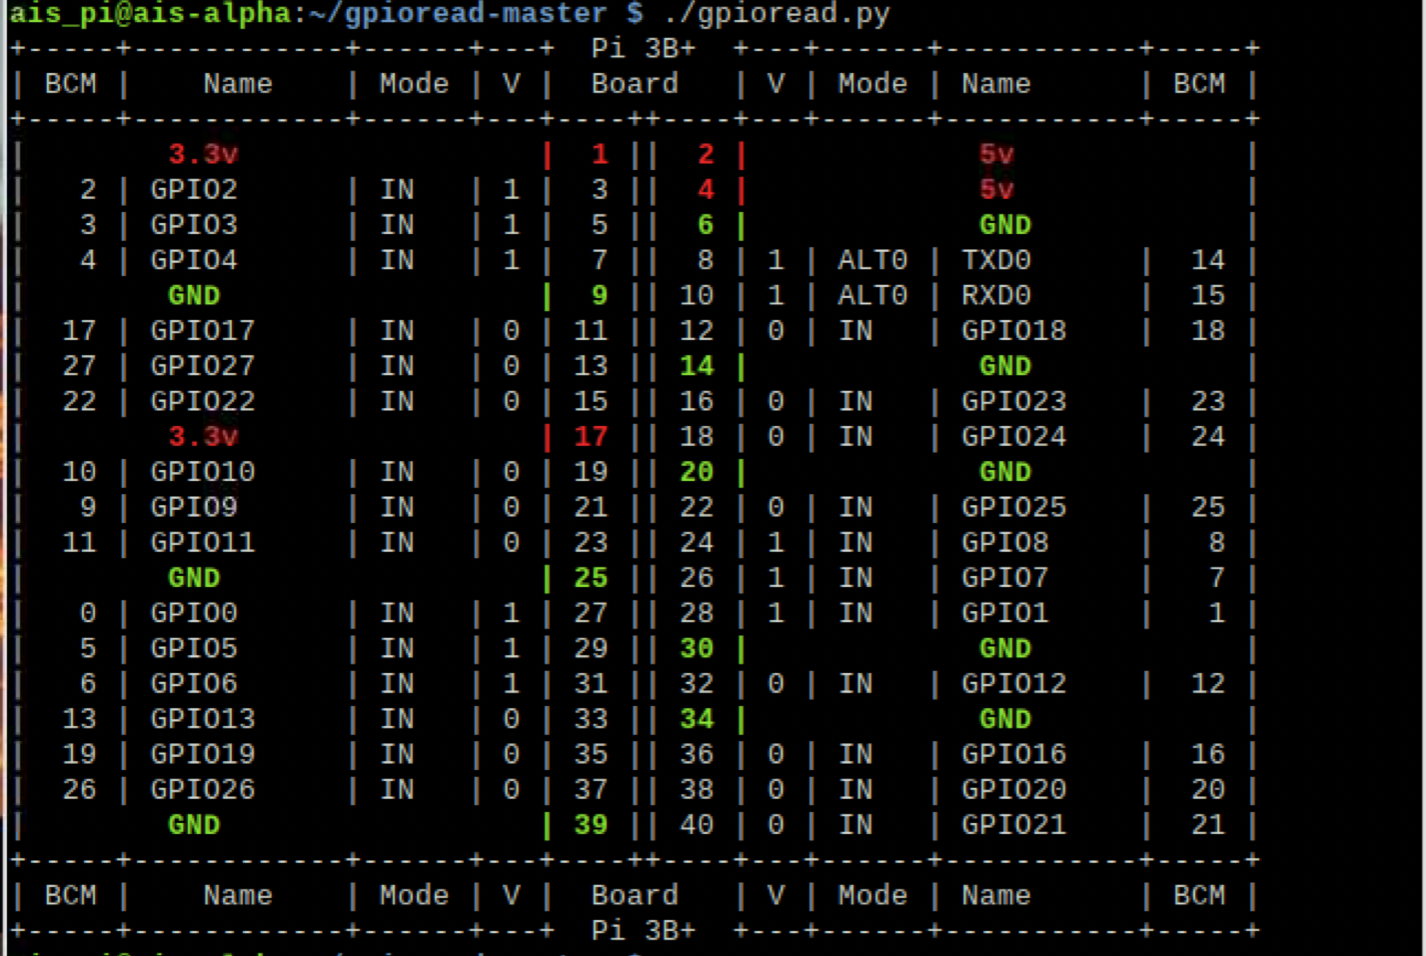
The remainder of this section describes some command-line tools that allow you to determine the status of the GPIO pins on the Raspberry Pi. This step is optional; it provides useful information if you would like to know more about the hardware, but is not essential to the operation of the dAISy Hat, the Raspberry Pi, or OpenCPN.
Raspberry Pi OS comes with the raspi-gpio command, which lists the state of the GPIO pins, one pin per line:
raspi-gpio get
To learn more, use the help argument to see all of the options.
If you want a somewhat easier-to-read representation of the GPIO status, download gpioread from Ian Binnie's (Milliways2) GitHub page. (gpioread replaces the deprecated gpio readall utility that came with Raspian.) Start by opening up a terminal window on the Raspberry Pi and then execute the following commands:
     cd ~
     wget https://github.com/Milliways2/gpioread/archive/refs/heads/master.zip
     unzip master.zip
     cd gpioread-master
     sudo pigpiod
     ./gpioread.py
For additional information, go to the Milliways2 GitHub page or this relevant StackExchange discussion.
Installing screen
screen is a terminal emulator with which you can communicate directly with the serial port, providing a mechanism with which to control and manage the dAISy Hat hardware. This step is optional; screen provides useful information but is not essential to the operation of the dAISy Hat or OpenCPN.
Install screen by issuing the following command from a terminal window:
sudo apt-get install screen
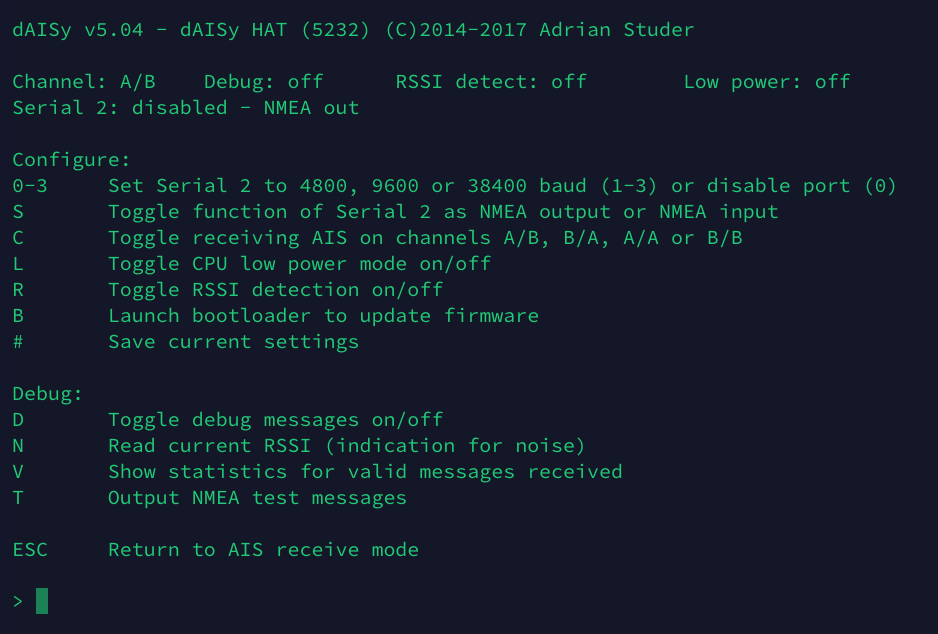
The dAISy Hat should be attached to Serial 0 port; under Raspberry Pi OS, note that /dev/serial0 is an alias for /dev/ttyS0. To connect to the hardware, type:
screen /dev/serial0 38400
Press <ESC> and you should see a display such as the following:
Note that if you press T, you will enter a mode where you can send AIS test messages (as National Marine Electronics Association [NMEA] 0183 / International Telecommunication Union [ITU] Recommendation M.1371-5 sentences):
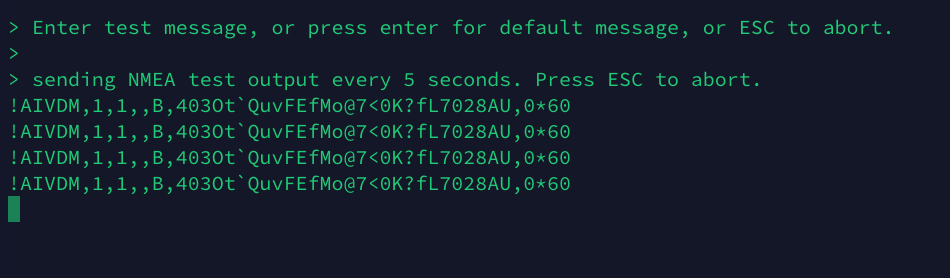
If you press <ENTER>, the software will transmit the AIS Type 4 message (Base Station Report) shown here every five seconds. Pressing <ESC> stops the transmission of test messages; pressing <ESC> again returns the device to receive mode. (If you are curious what the message says, use one of the AIS parsing Web sites or my AIS parser software described in the Interpreting the Data section below.)
You can exit screen by entering command mode (^A), then pressing K (kill process), followed by Y (yes). To obtain a complete list of screen commands and options, type:
man screen
OpenCPN
OpenCPN is free, open source chartplotter and maritime GPS navigation software that can run on Android, Debian, Fedora, Flatpak, Linux, MacOS, Raspberry Pi, Ubuntu, and Windows systems — it seems about every platform except iPadOS and iOS. While designed to be used while underway or for planning purposes, it also provides a useful tool for AIS projects.
For my research purposes, I use OpenCPN to track both live and spoofed traffic. I do not actually transmit AIS messages over the air, but examine the effects using OpenCPN on the same system that generates the bogus AIS traffic and is receiving real AIS traffic. There is a very cool GitHub site that describes MAIANA™: The Open Source AIS Transponder if you are looking for an alternative to using a software-defined radio (SDR) approach.
To learn more about OpenCPN, visit OpenCPN.org, the source of all things OpenCPN! In particular, there are a wide variety of manuals to be found at that site, including:
The steps outlined below should work on Raspberry Pi OS version 11 (aka bullseye). If you are not sure what version of Raspian or other Linux distro you are using, use the following command:
cat /etc/os-release
Prepare for the OpenCPN installation by creating an opencpn directory under your home directory:
     mkdir ~/opencpn
     cd ~/opencpn
PGP Key Management
The first step in order to download and install OpenCPN is to manually create a Pretty Good Privacy (PGP) keyfile. This process will ensure that you have the latest, most current key.
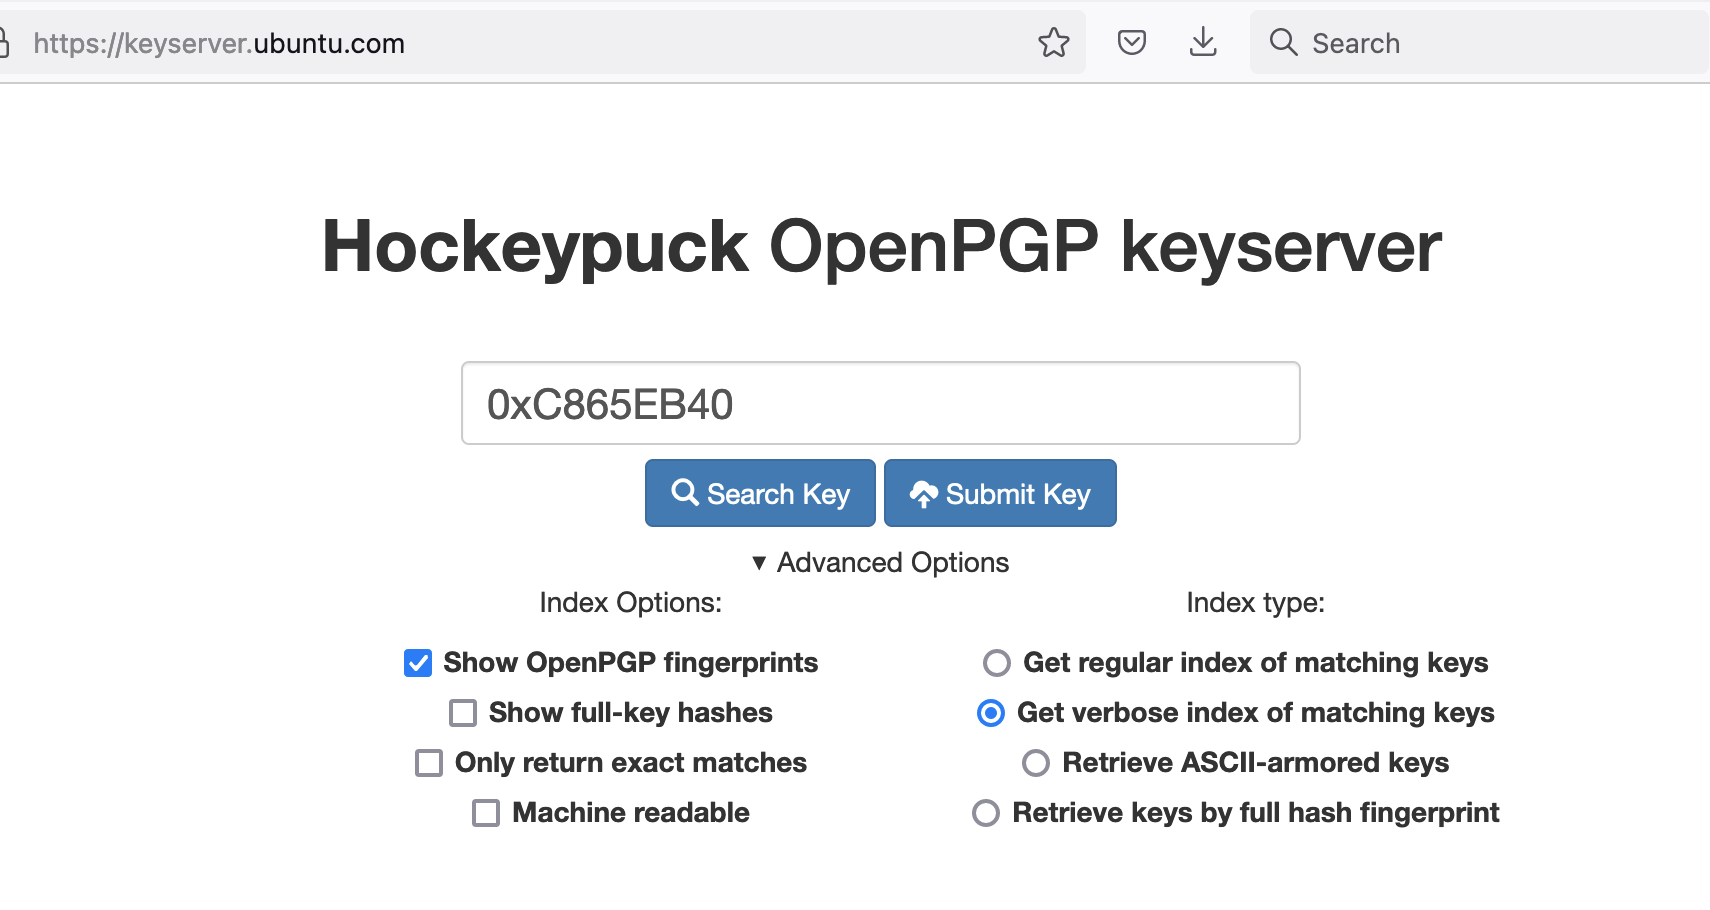
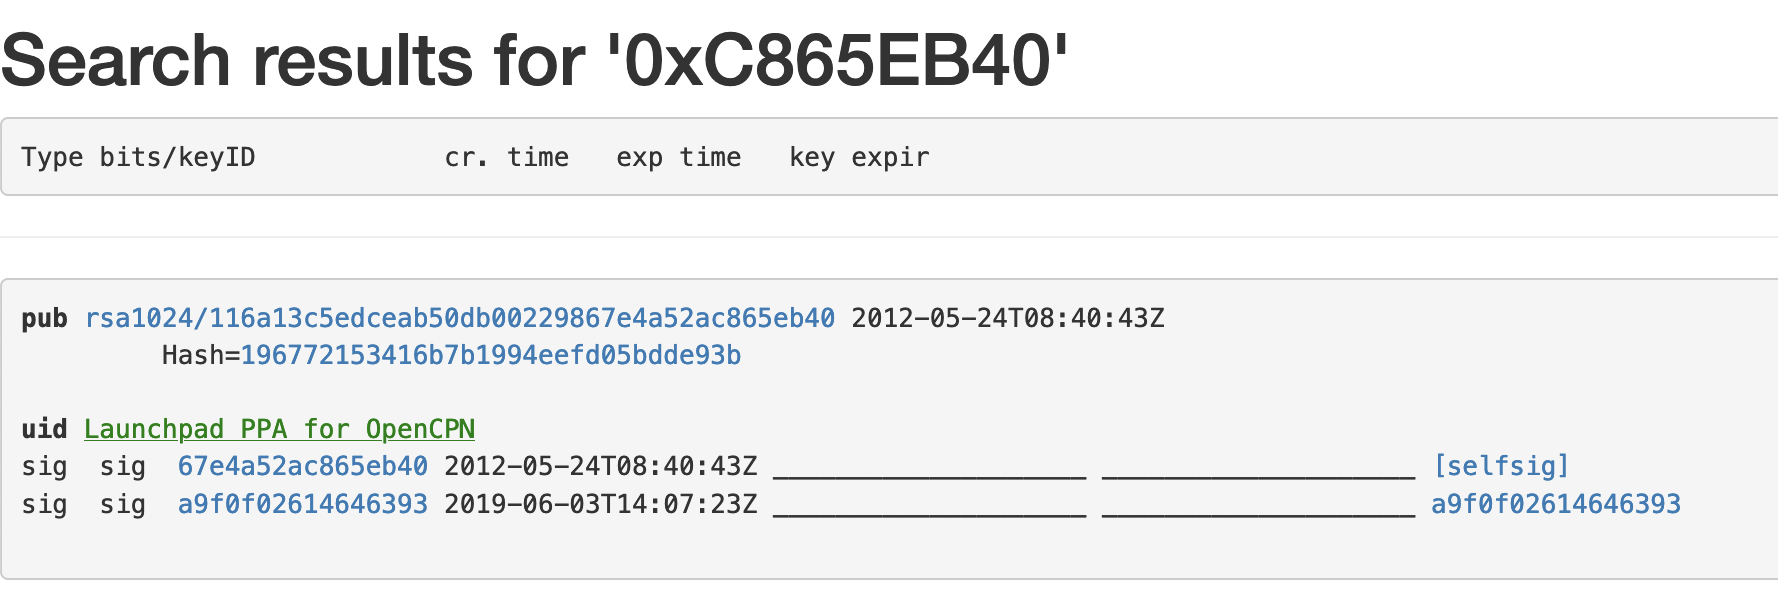
Point your browser to the OpenPGP Public Key Server.
- In the Search String field, enter the key 0xC865EB40.
- All options should be OFF except "Get verbose index of matching keys."
- Click the Search Key button.
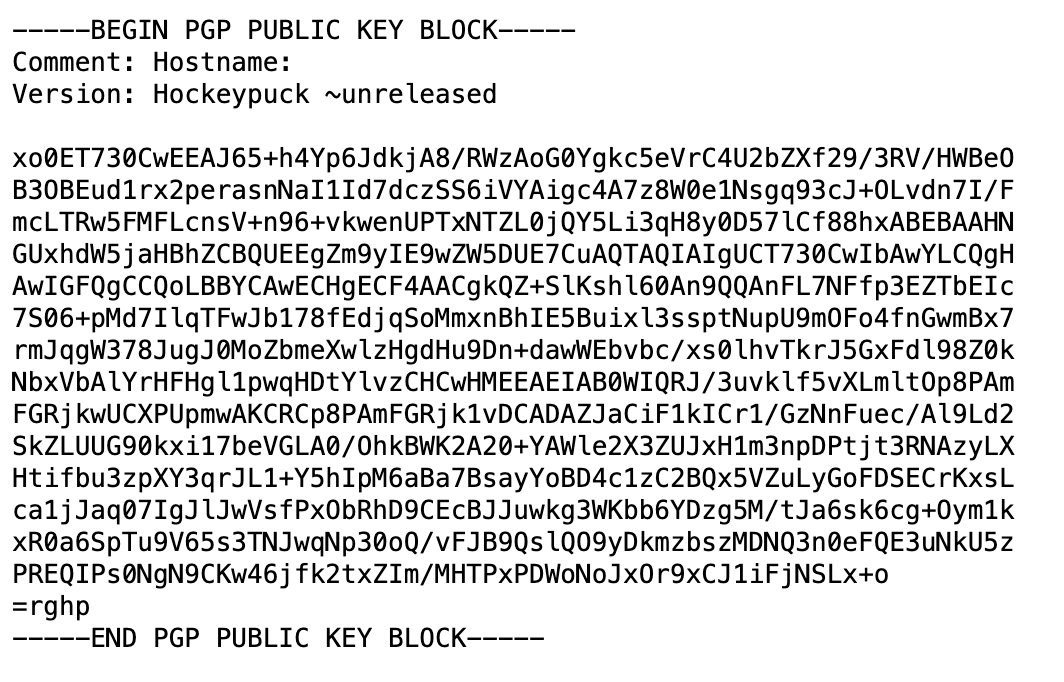
- A new Web page, similar to the one below, will open. Click on the rsa1024/ link provided in the pub section.
This should take you to page similar to the one below that contains the key.
Use nano or another text editor to open/create a text file called opencpn_key.txt (or, use another name if you want) in the opencpn directory. Copy the Web page text starting from "-----BEGIN PGP PUBLIC KEY BLOCK-----" to the end of the page, and paste it into the opencpn_key.txt file. Use ^O to write the file and ^X to exit the editor. Use the cat opencpn_key.txt command to verify the file.
Download and Install OpenCPN
Start the OpenCPN installation by typing:
sudo nano /etc/apt/sources.list
The nano text editor will open. Move the cursor to the end of the file and add this line (assuming that you are using Raspberry Pi OS "bullseye"):
deb http://ppa.launchpad.net/opencpn/opencpn/ubuntu/ bullseye main
In the command above, you are obtaining an Ubuntu Personal Package Archive (PPA) that is compatible with your version of Raspberry Pi OS. The keyword bullseye refers to the version of Ubuntu compatible with Raspberry Pi OS version 11. If using Raspian Stretch, the compatible Ubuntu release is xenial; for Raspian Buster, it is bionic.
Save the updates and close the file.
Now, install the PGP key, get updated software sources, and install OpenCPN:
     sudo apt-key add opencpn_key.txt
     sudo apt-get update
     sudo apt-get install opencpn
There may be some error messages; read them and document any additional commands that you need to execute.
Run and Configure OpenCPN
Run OpenCPN by typing opencpn from the command line or by clicking the Application (Raspberry) icon, Education, OpenCPN from the GUI.
The first thing to do, in almost all cases, will be to load some charts; this is possibly the most painful part of OpenCPN:
- Click on Options (the crescent wrench or gear icon)
- Click on Charts
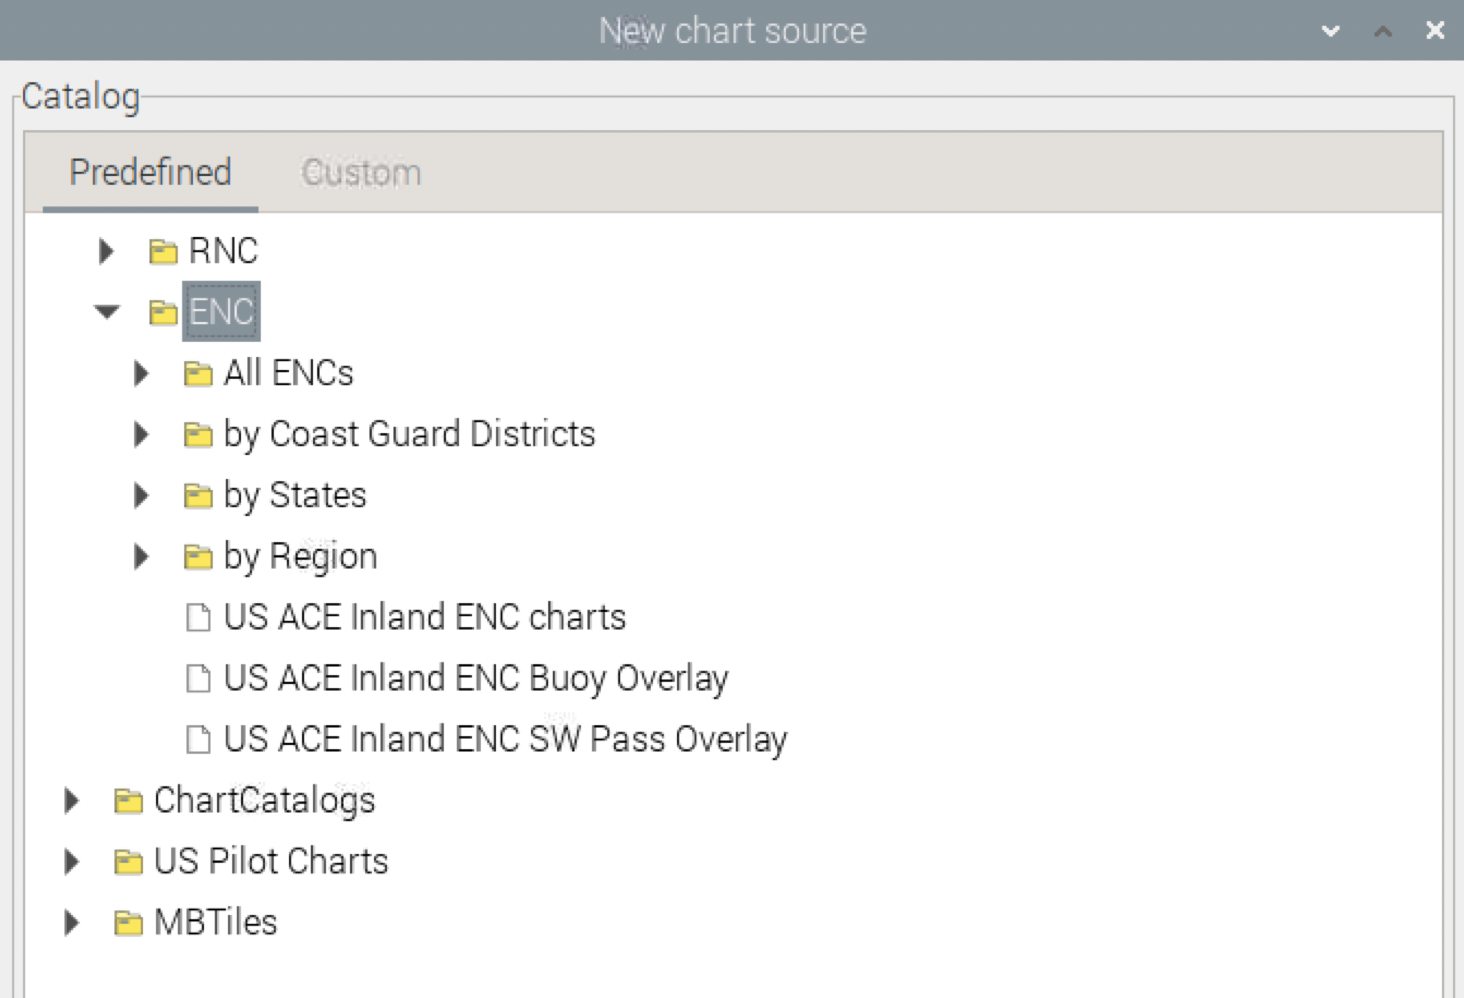
- Here is where things can get a bit complicated. The easiest way to download charts is to select the Chart Downloader tab.
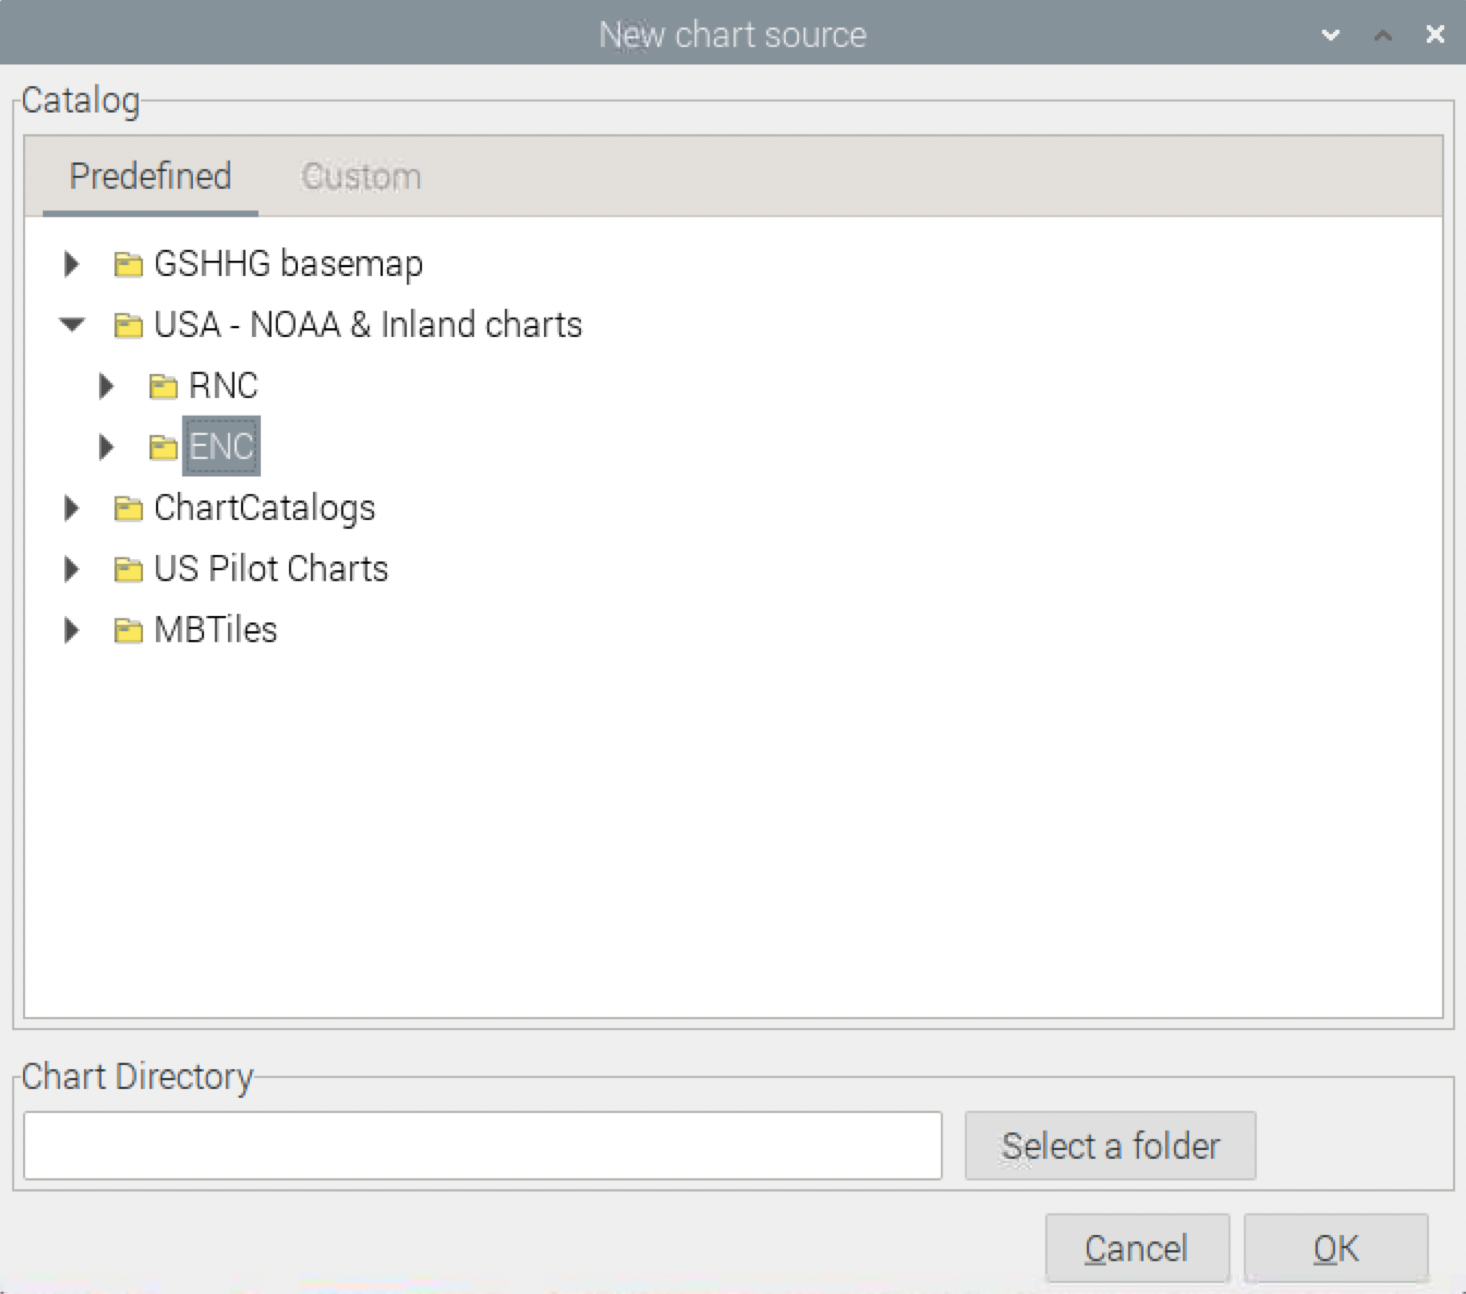
- Click the Add Catalog button to see the Chart Catalog. From here, you can scroll down to see a variety of chart catalogs. In this case, I select the "USA - NOAA & Inland charts" catalog of Electronic Navigation Charts (ENC). [[ Where possible, use ENC charts... ]]
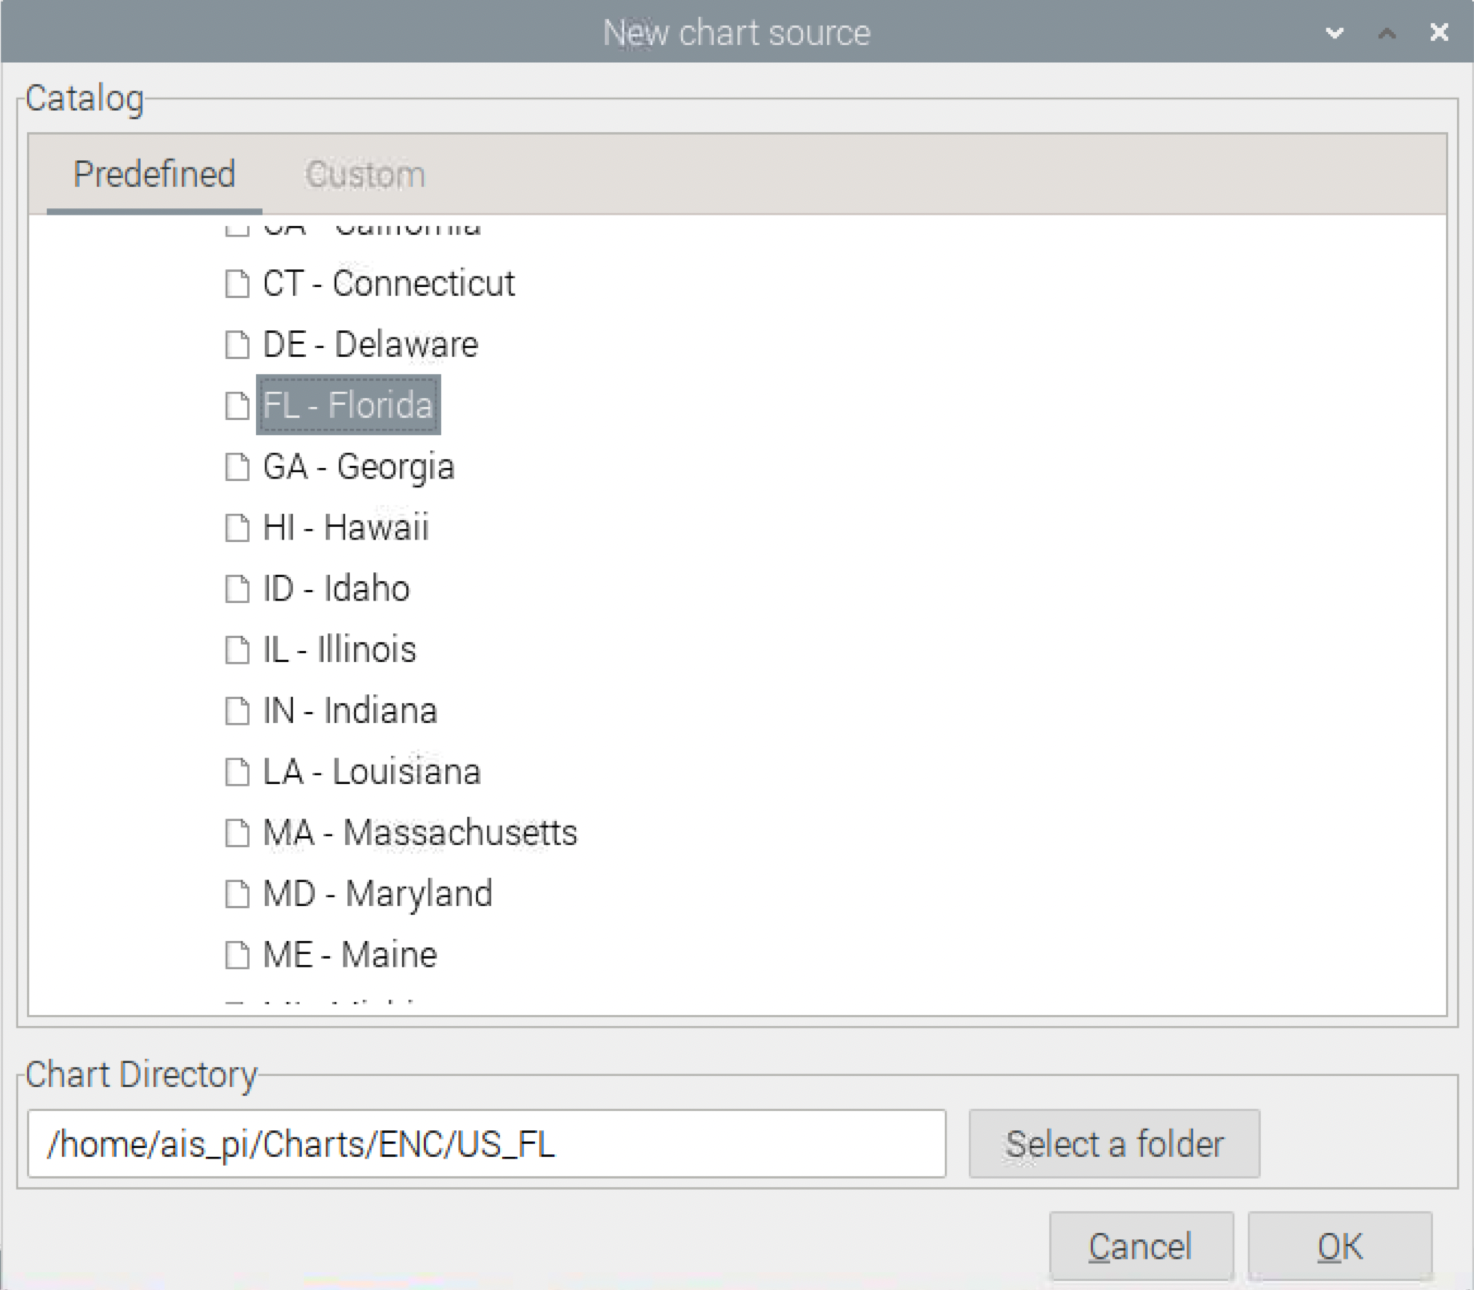
- The ENC NOAA charts can be viewed by state, USCG District, and other options. In this case, I select "by States" and scroll down to select "Florida" by clicking OK.
- Download the desired catalogs into the directory by clicking the OK button.
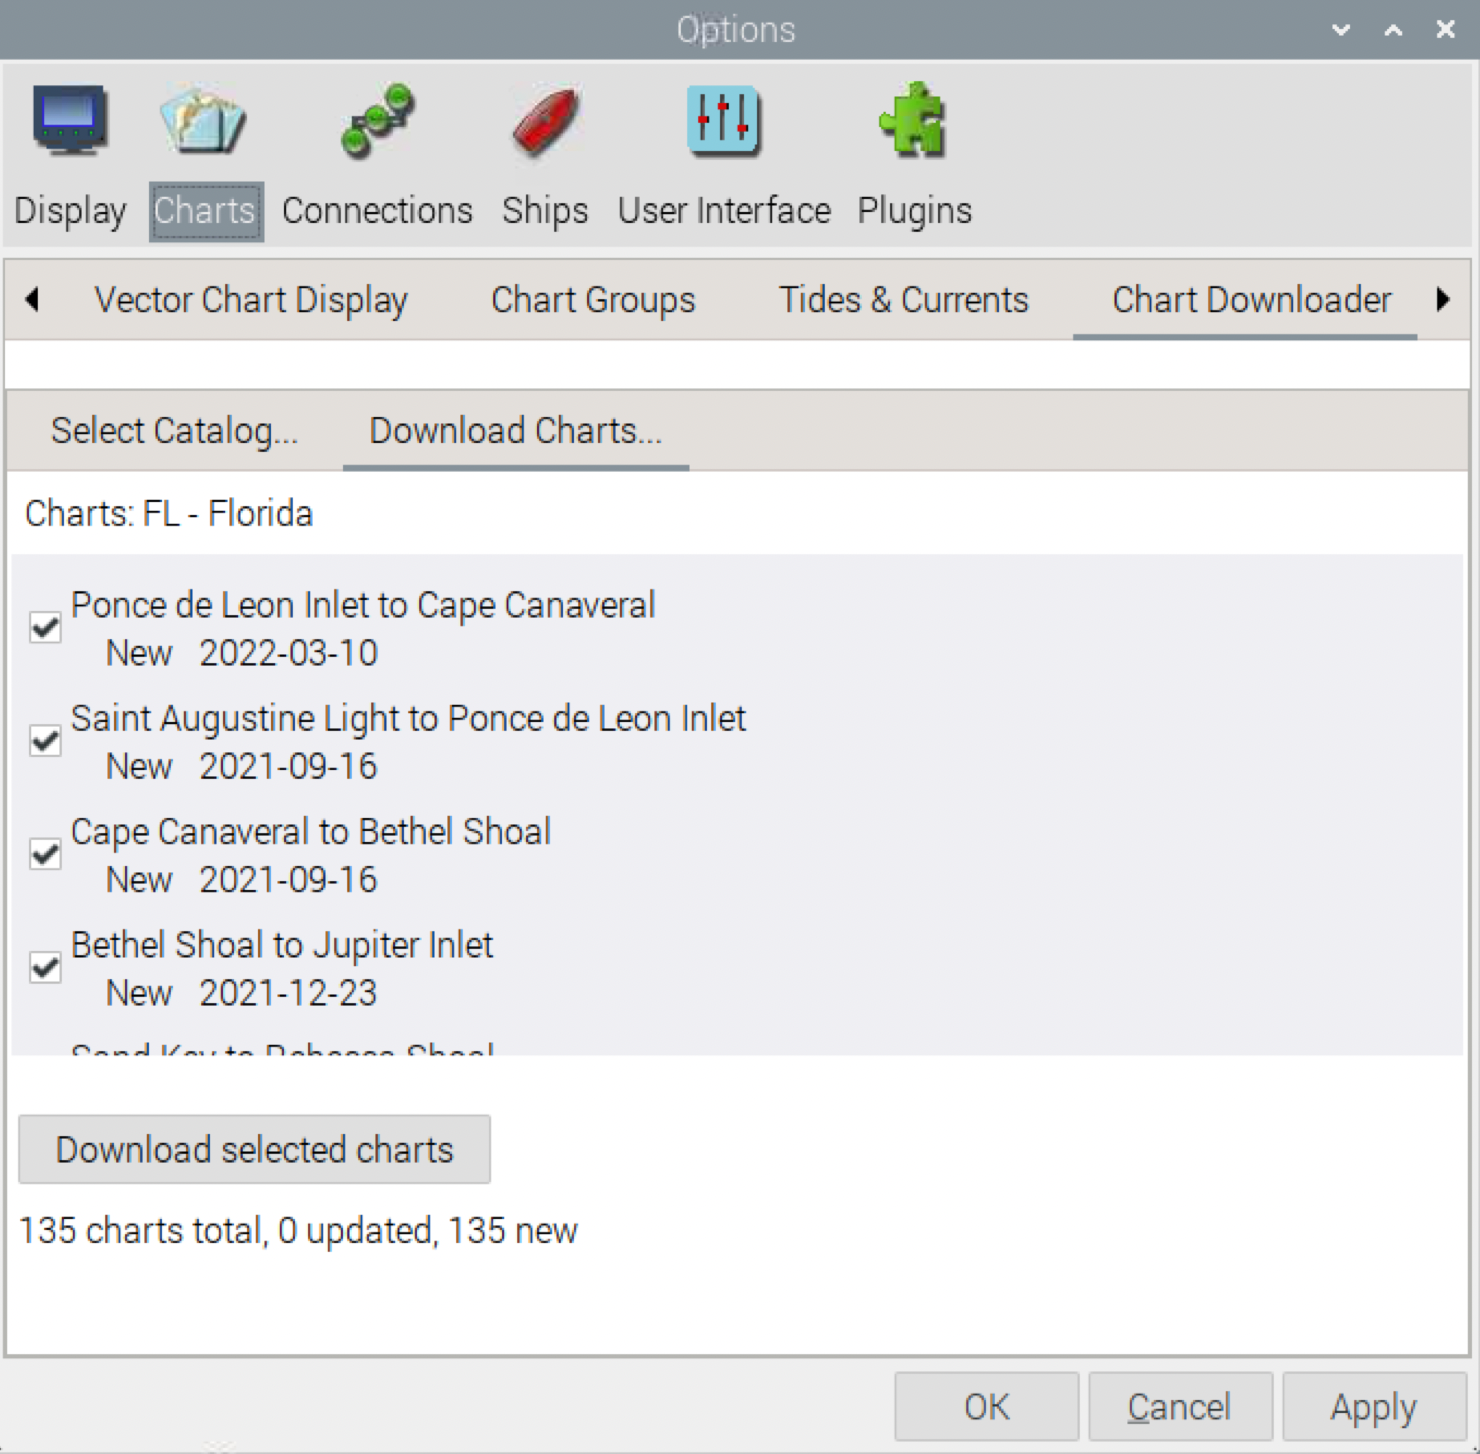
- Select a catalog by clicking on it. Next, click on the Download Charts... tab. You should see a list of chart names. Scroll through the box to select the charts that you want. In order to make this selection, you need to know the name of the chart(s) you want; knowing the chart number is useful, but only as a way to learn the name because the catalog in OpenCPN only lists names. Click the "Download selected charts" button to download the charts to your system. When that is complete, click OK.
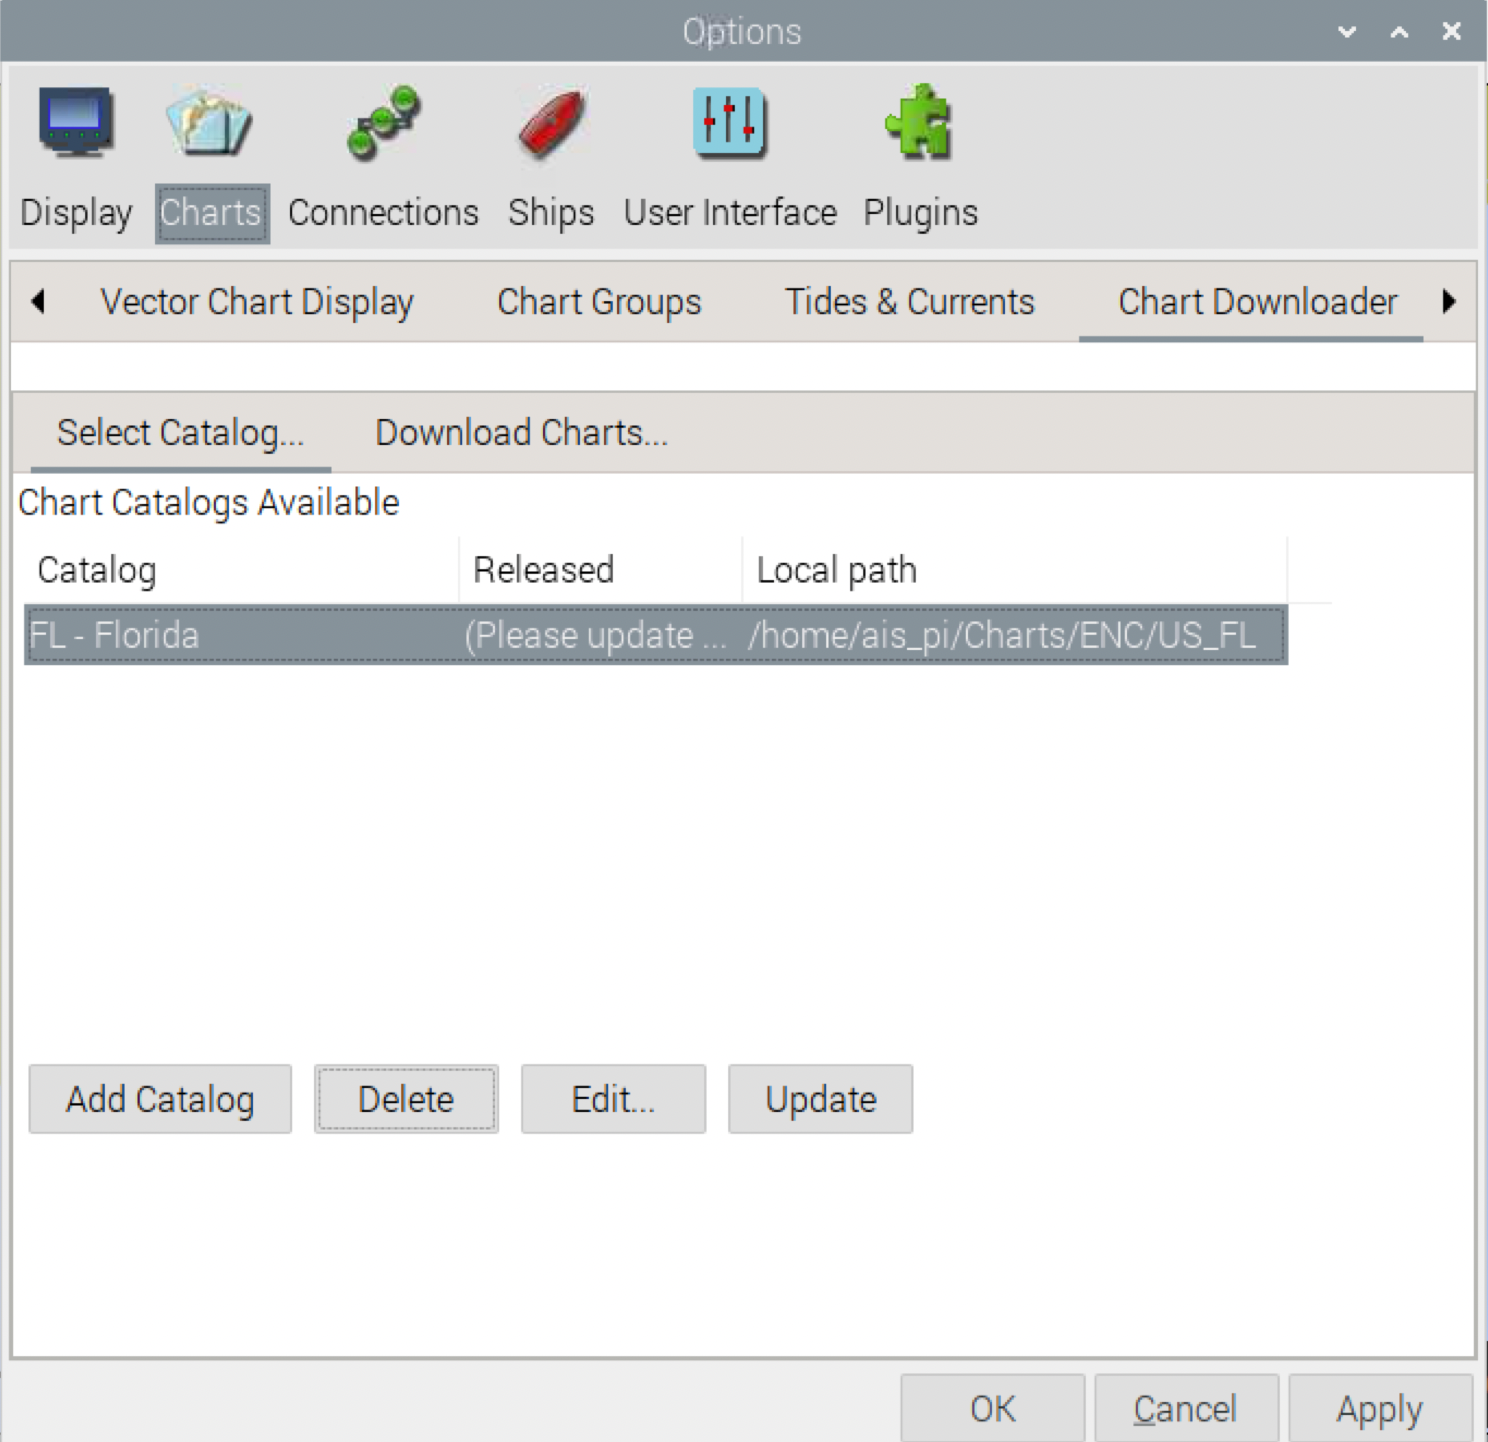
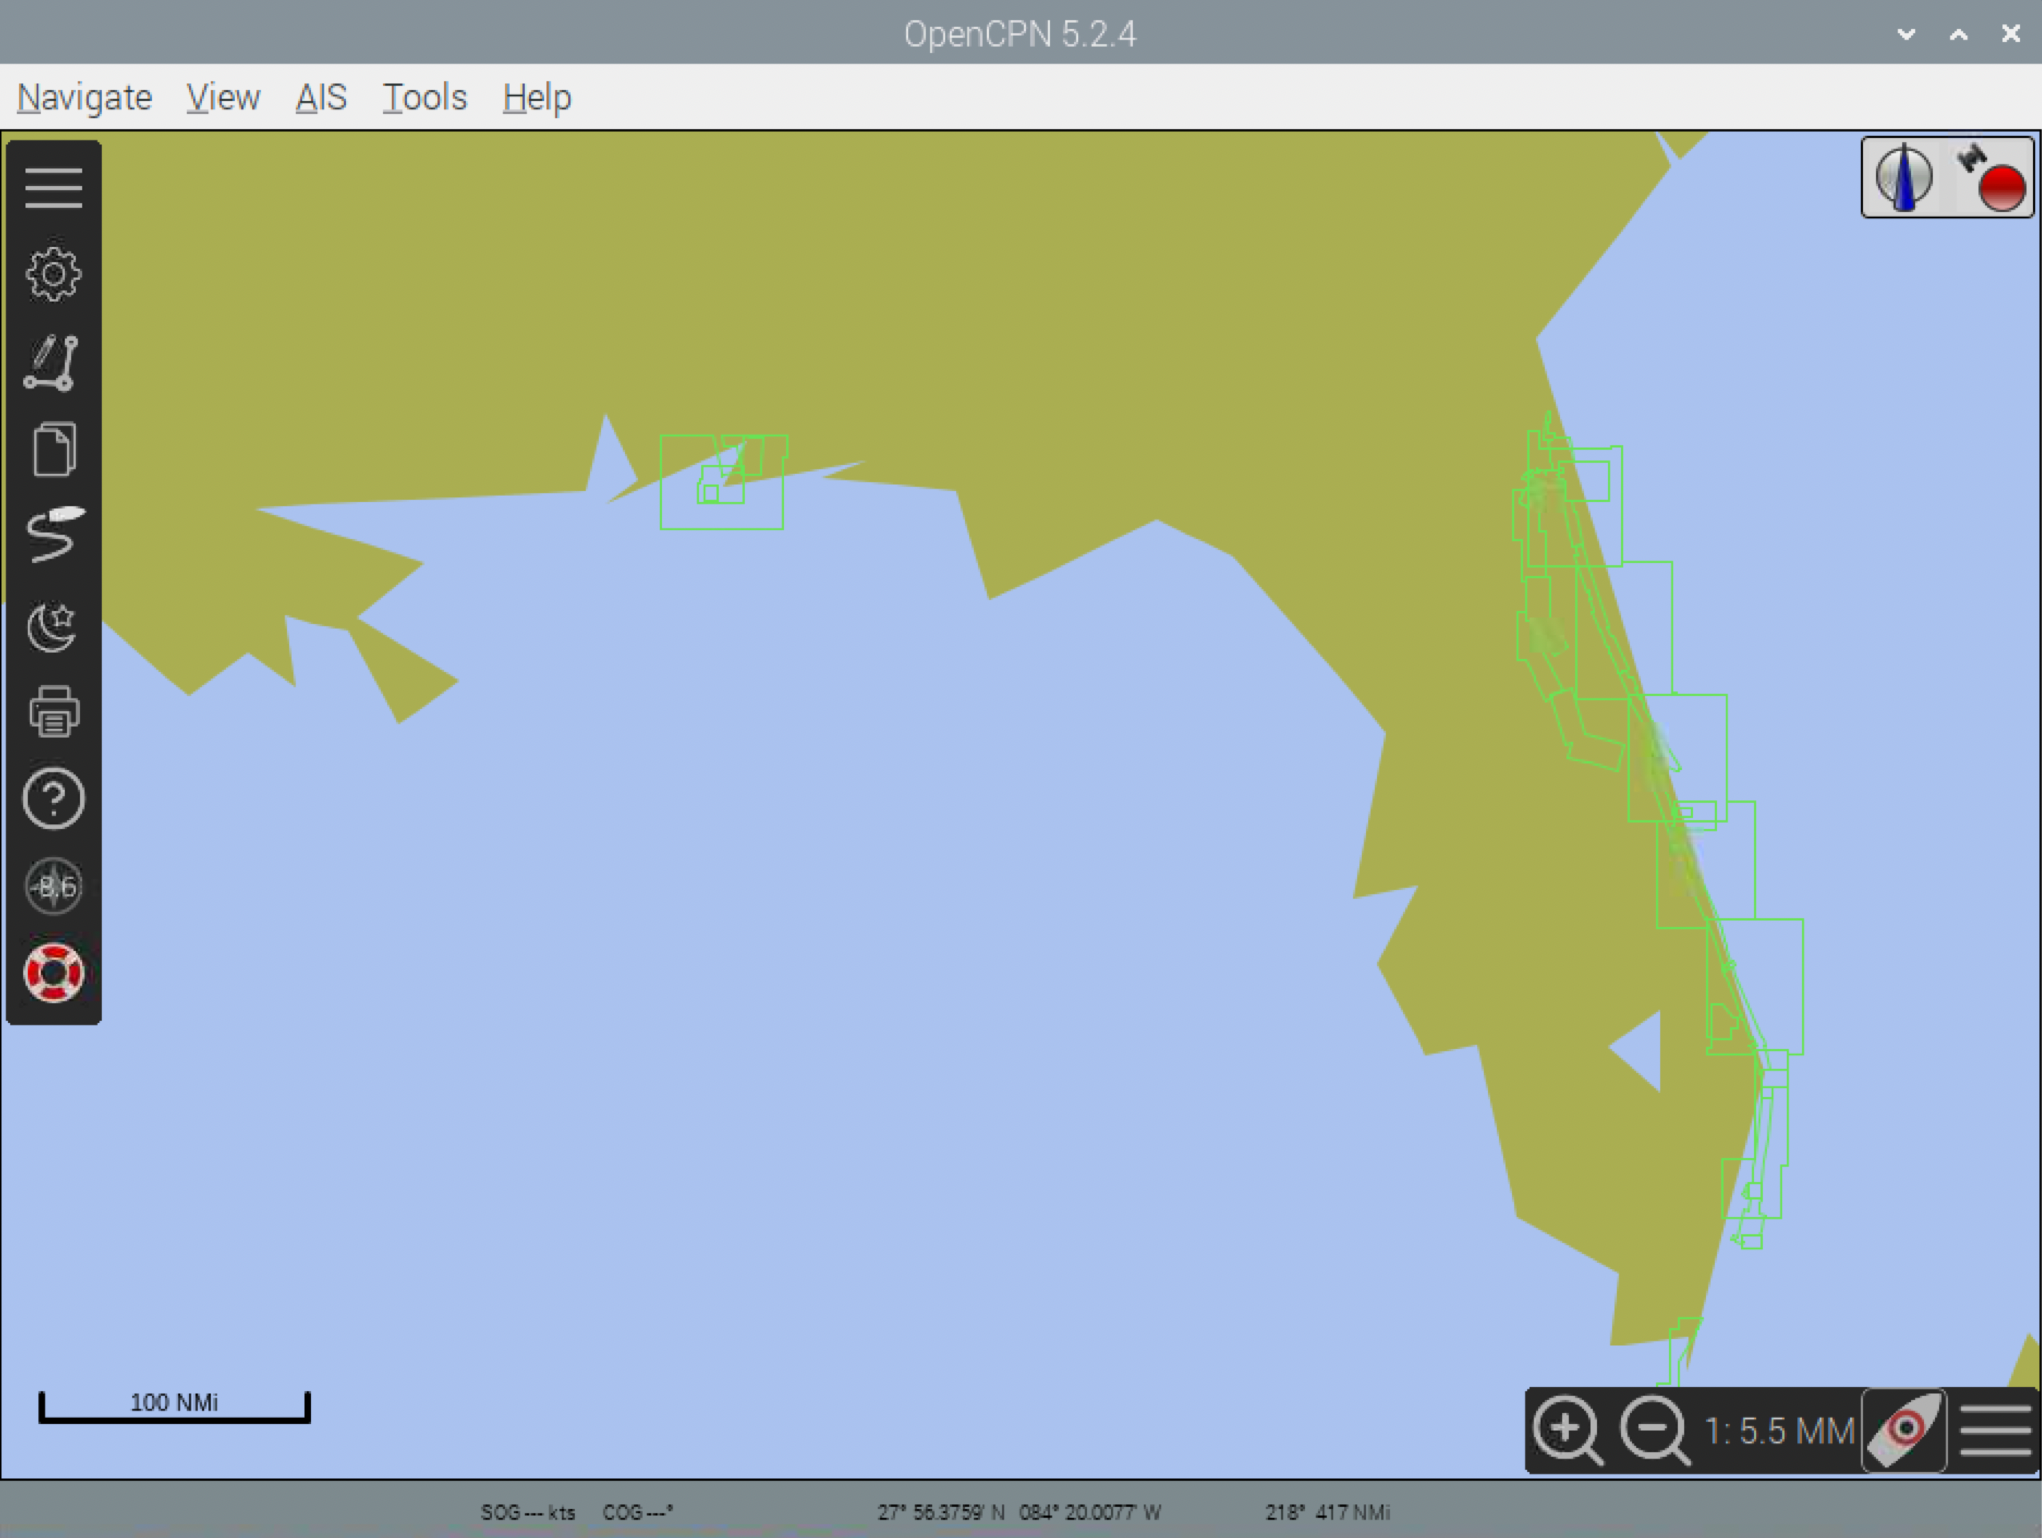
- The configuration shown below displays the selected charts from Florida. Scroll in closer to get the detail!


Next, configure your data source:
- As above, click on Options (the crescent wrench or gear icon)
- Click on Connections
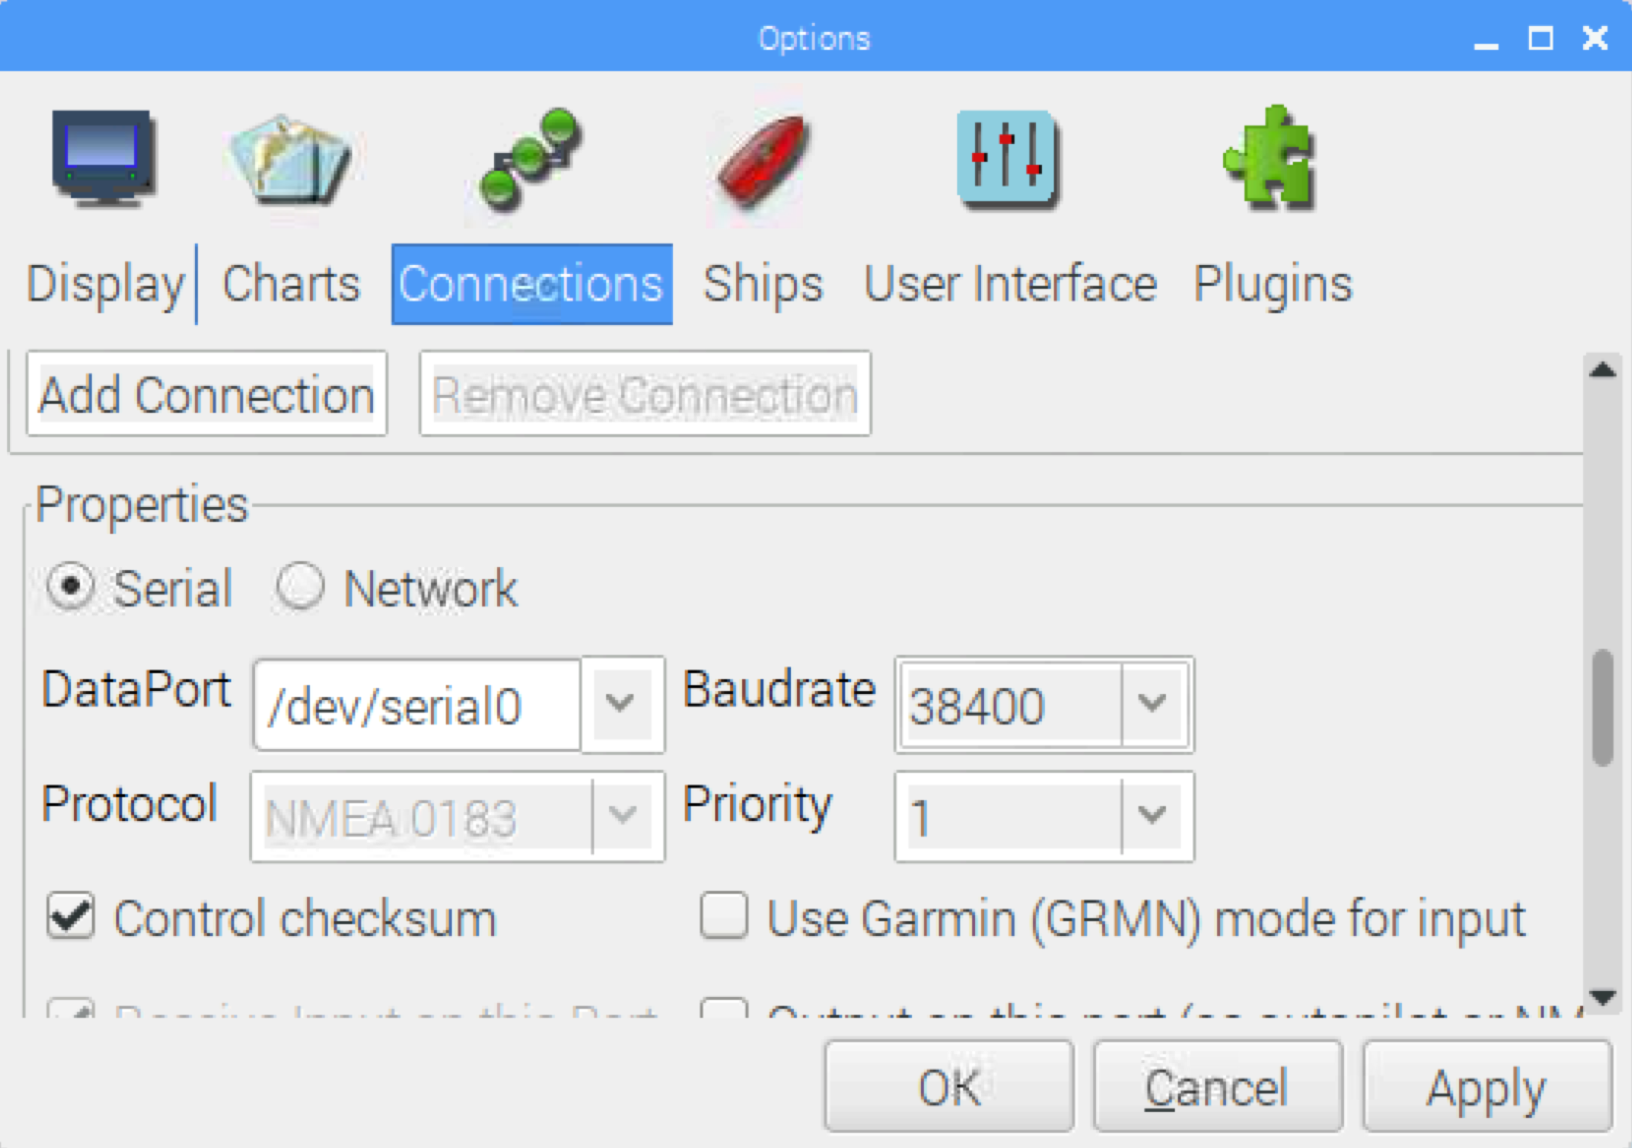
- Scroll down and click the Add Connection button
- Under Properties:
- If you are using the dAISy Hat (or other data source on the serial I/O bus):
- Click the Serial radio button
- Select (or enter) '/dev/ttyS0/ or '/dev/serial0' in the DataPort field
- Select a Baudrate of 38400
- Click OK
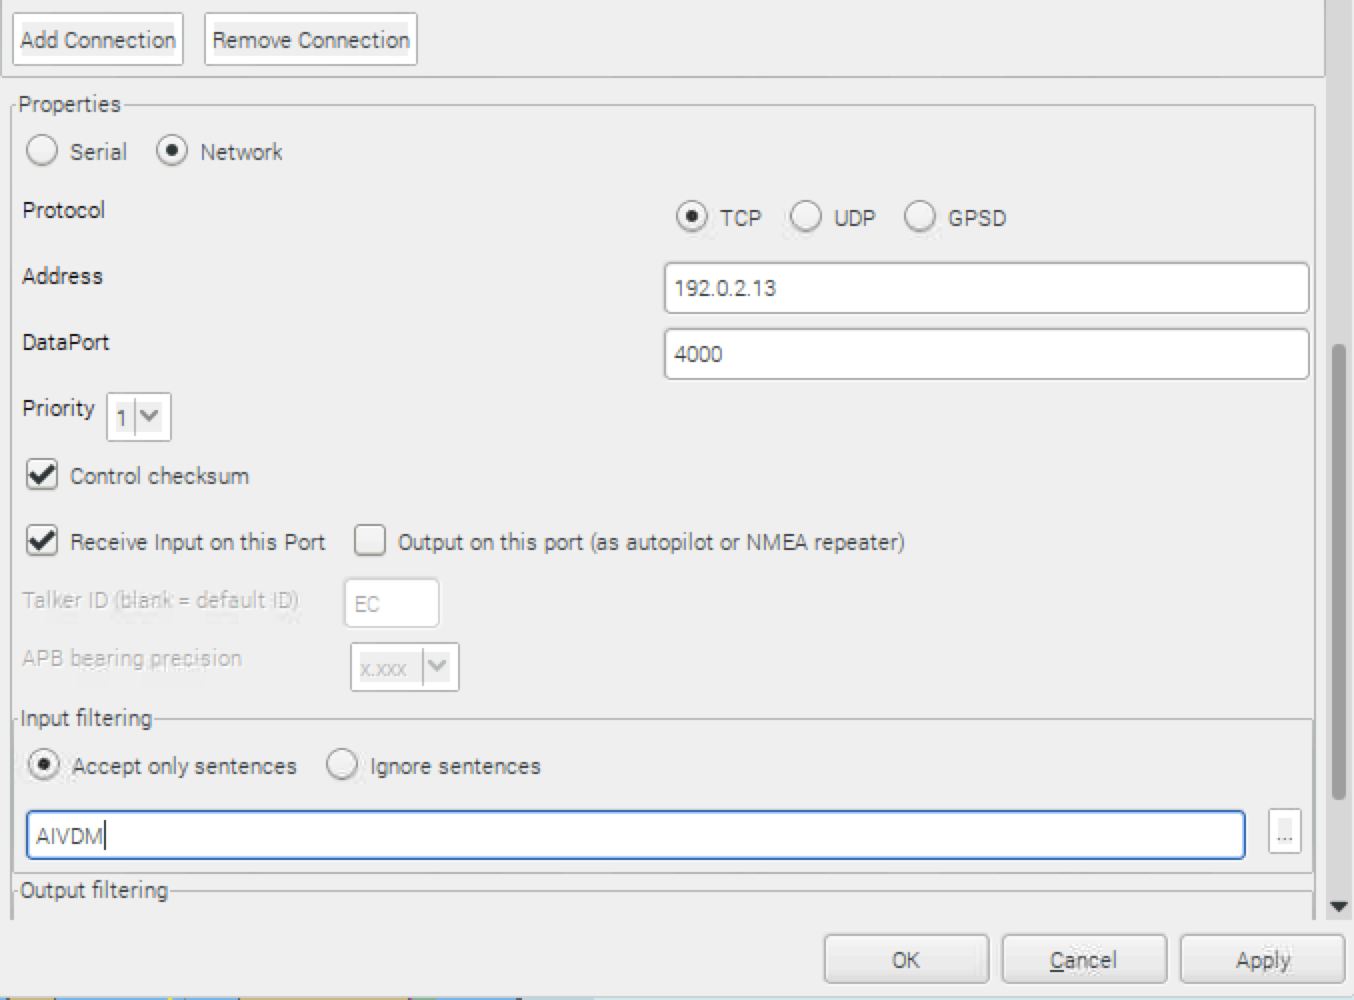
- If you are using an external device and getting a network-based data feed:
- Click the Network radio button
- Select the protocol (most likely to be TCP but will depend upon your setup)
- Enter the IP address of the device
- Enter the port number used by the protocol
- Click OK
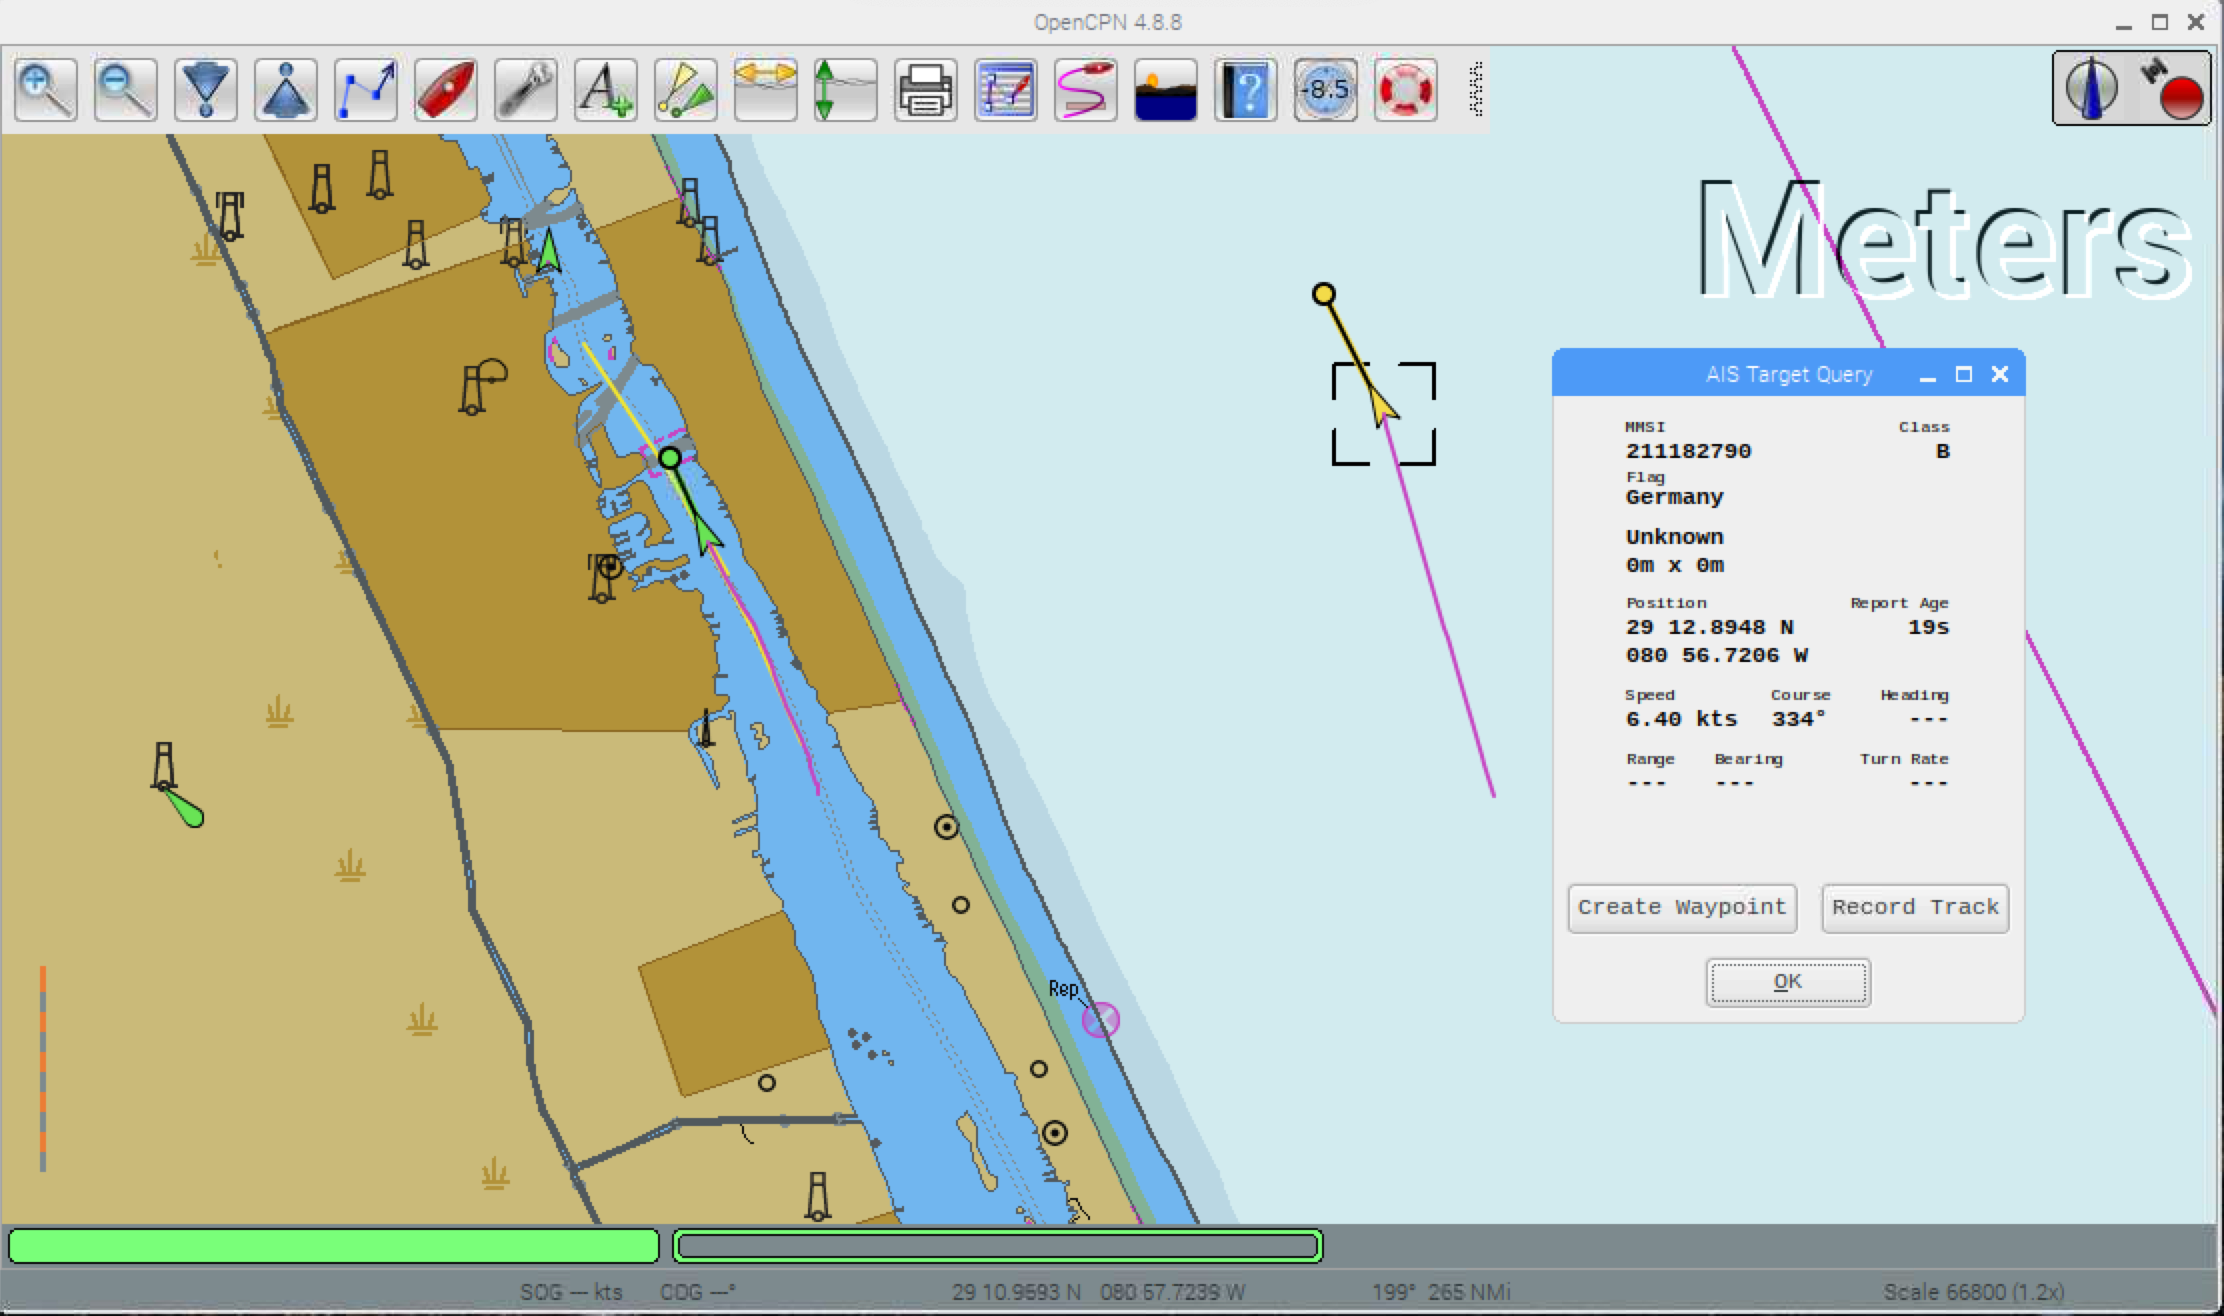
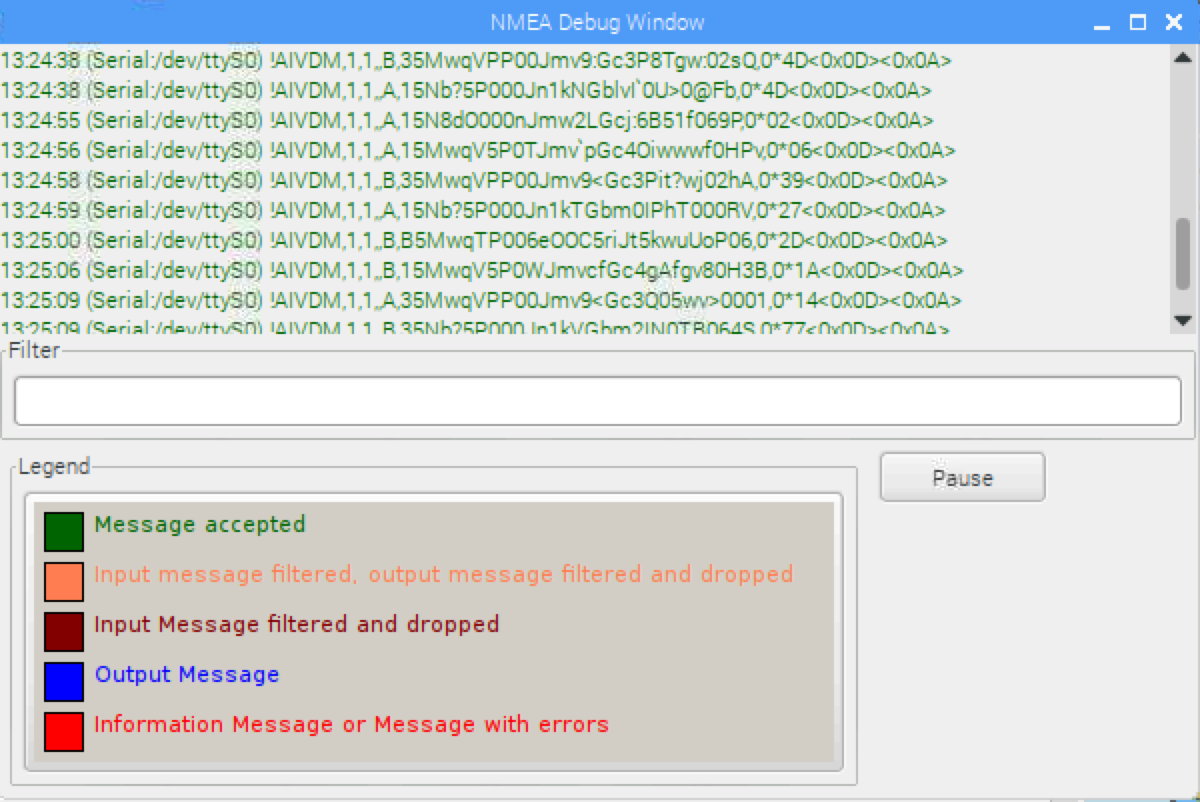
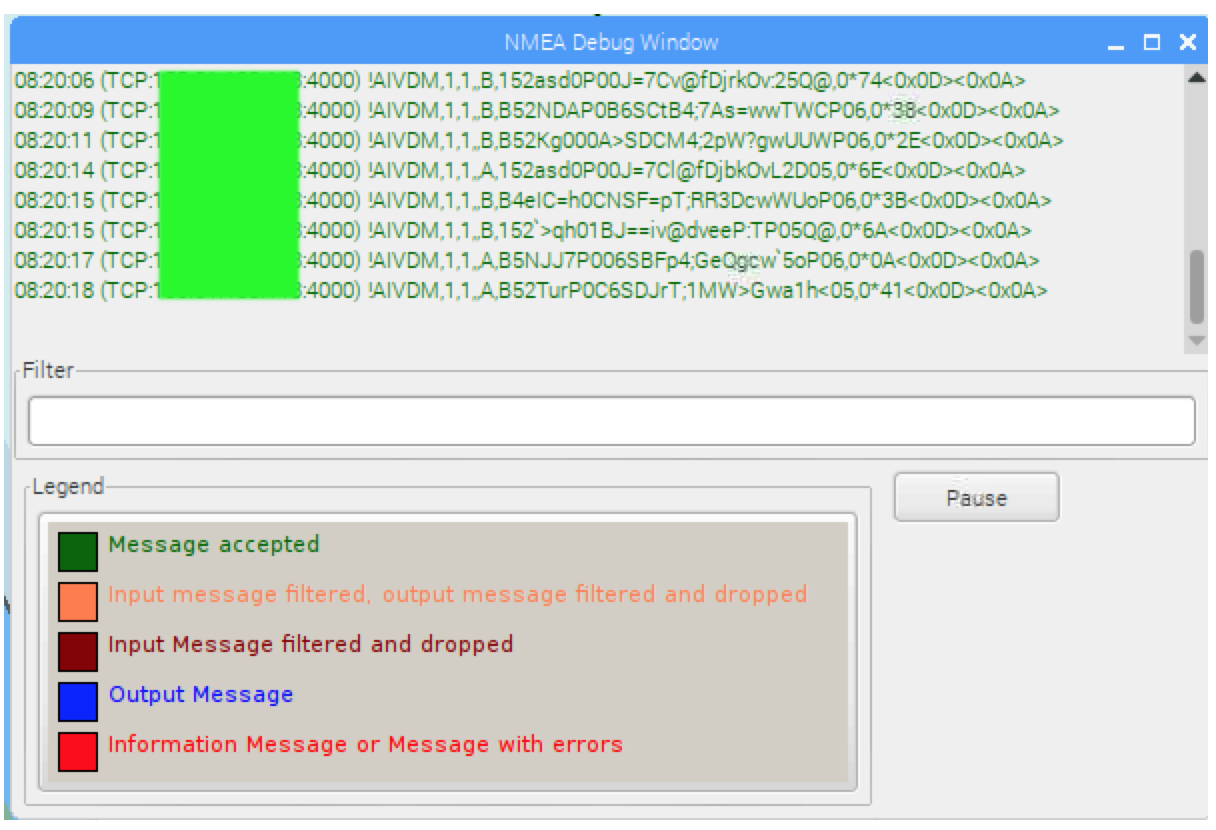
Under Connections, you can check the Show NMEA Debug Window box to see the actual NMEA/ITU sentences (screen shots below for the serial and network connections, respectively):
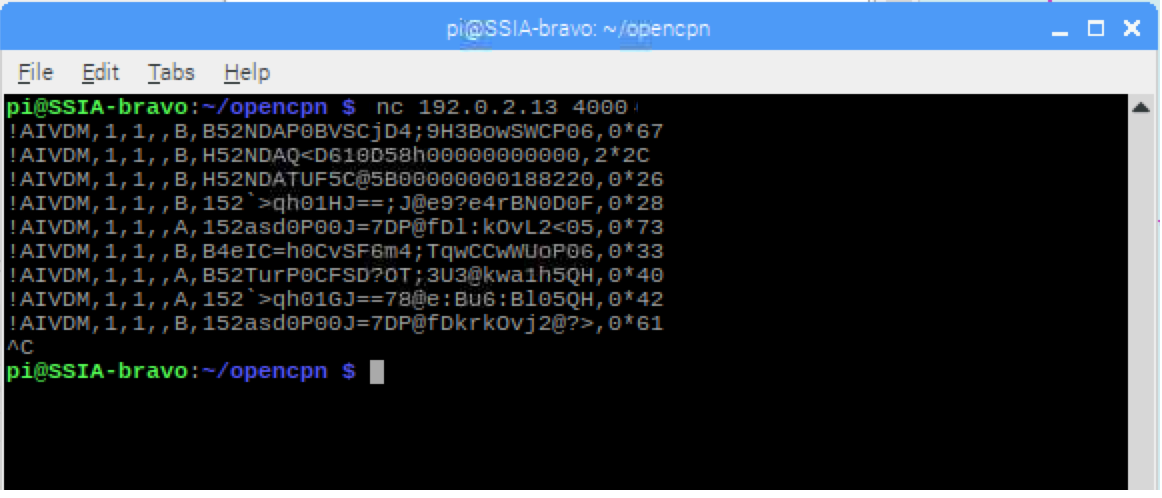
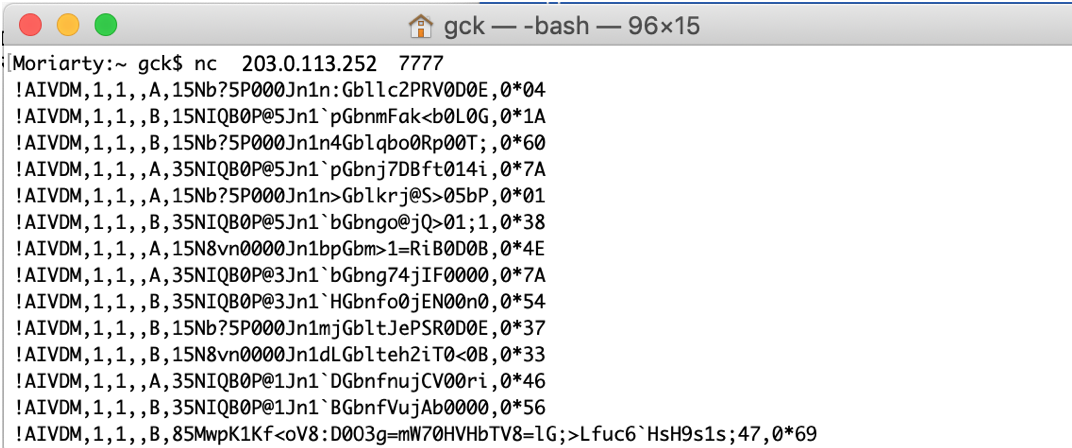
Note that when using OpenCPN with a network data source, the raw data feed can be captured directly using the netcat (nc) or telnet command, in the form:
     nc SOURCE_IP_ADDRESS PORT
     telnet SOURCE_IP_ADDRESS PORT
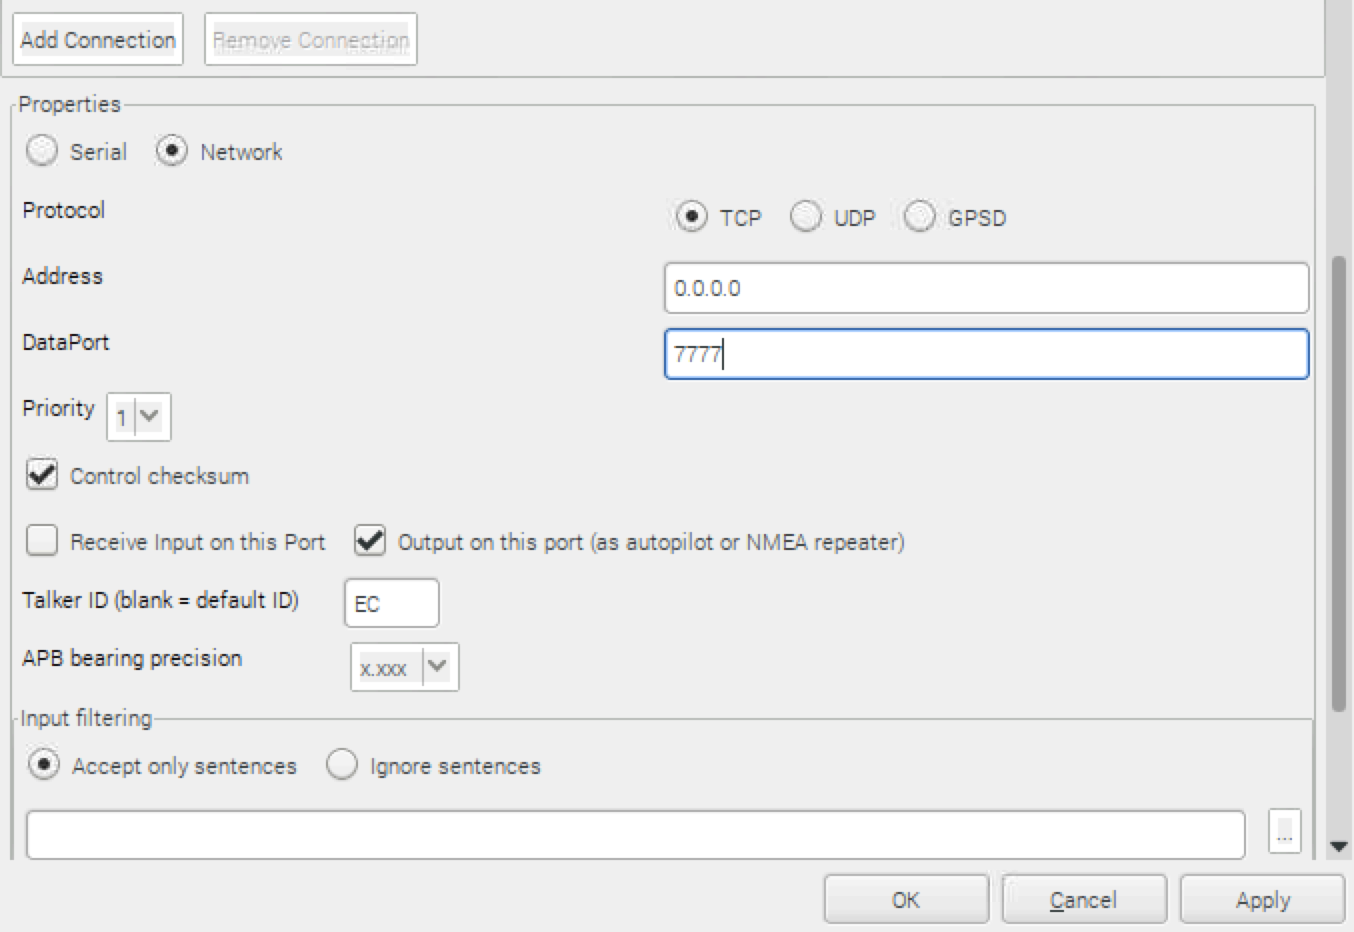
OpenCPN can also be used as a data server and create a data stream from its input. This is particularly useful if you are reading from a serial interface; OpenCPN can read from serial0, for example, and produce a TCP data stream. Setting this up is very straight-forward:
- Add a new connection, as above.
- Click the Network radio button
- Select the TCP protocol
- Use the IP address 0.0.0.0 since you are using yourself as the source
- Enter the port number you'd like to use (it is best to use a value in the range 1024-65535)
- Uncheck the Receive input on this Port box
- Check the Output on this port box
- Click OK
At this point, you have two open connections, and OpenCPN is accepting input from whatever source you had been using and sending output on your desired TCP port.

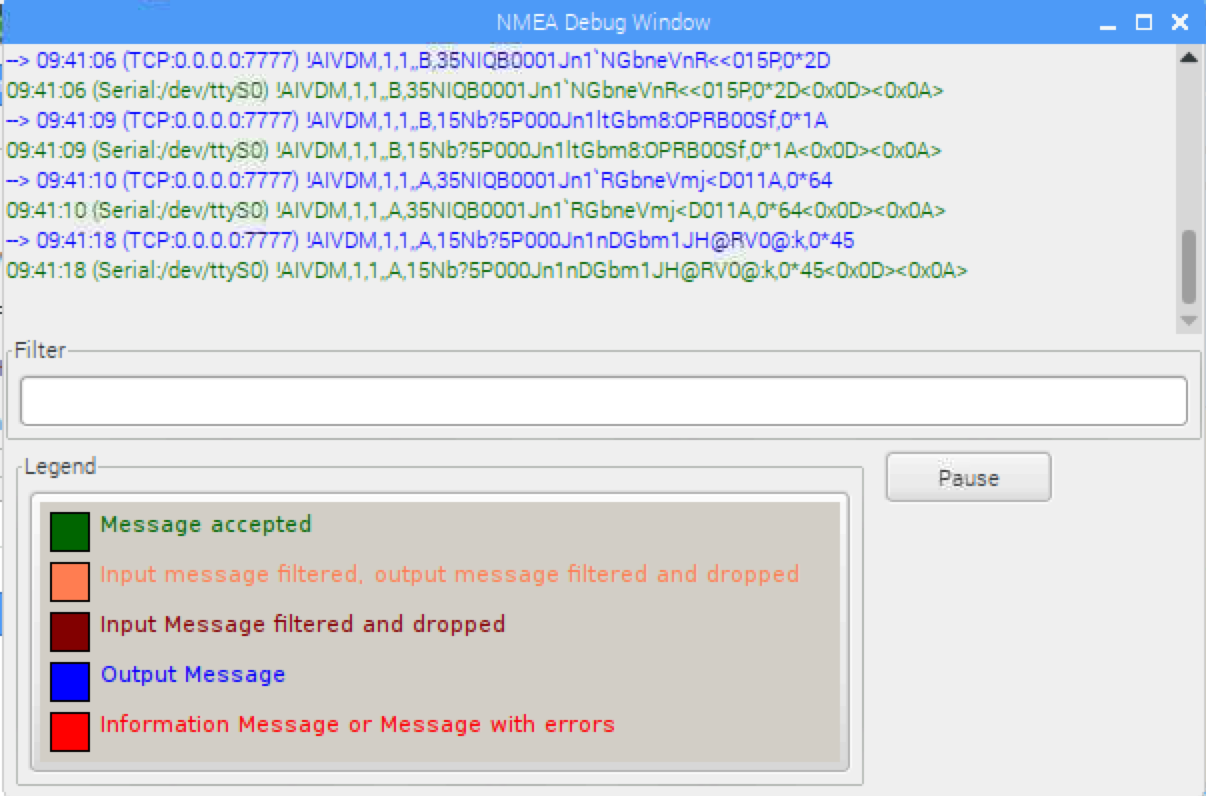
Read your raw data stream, as above, from a terminal or any other application using netcat or telnet.
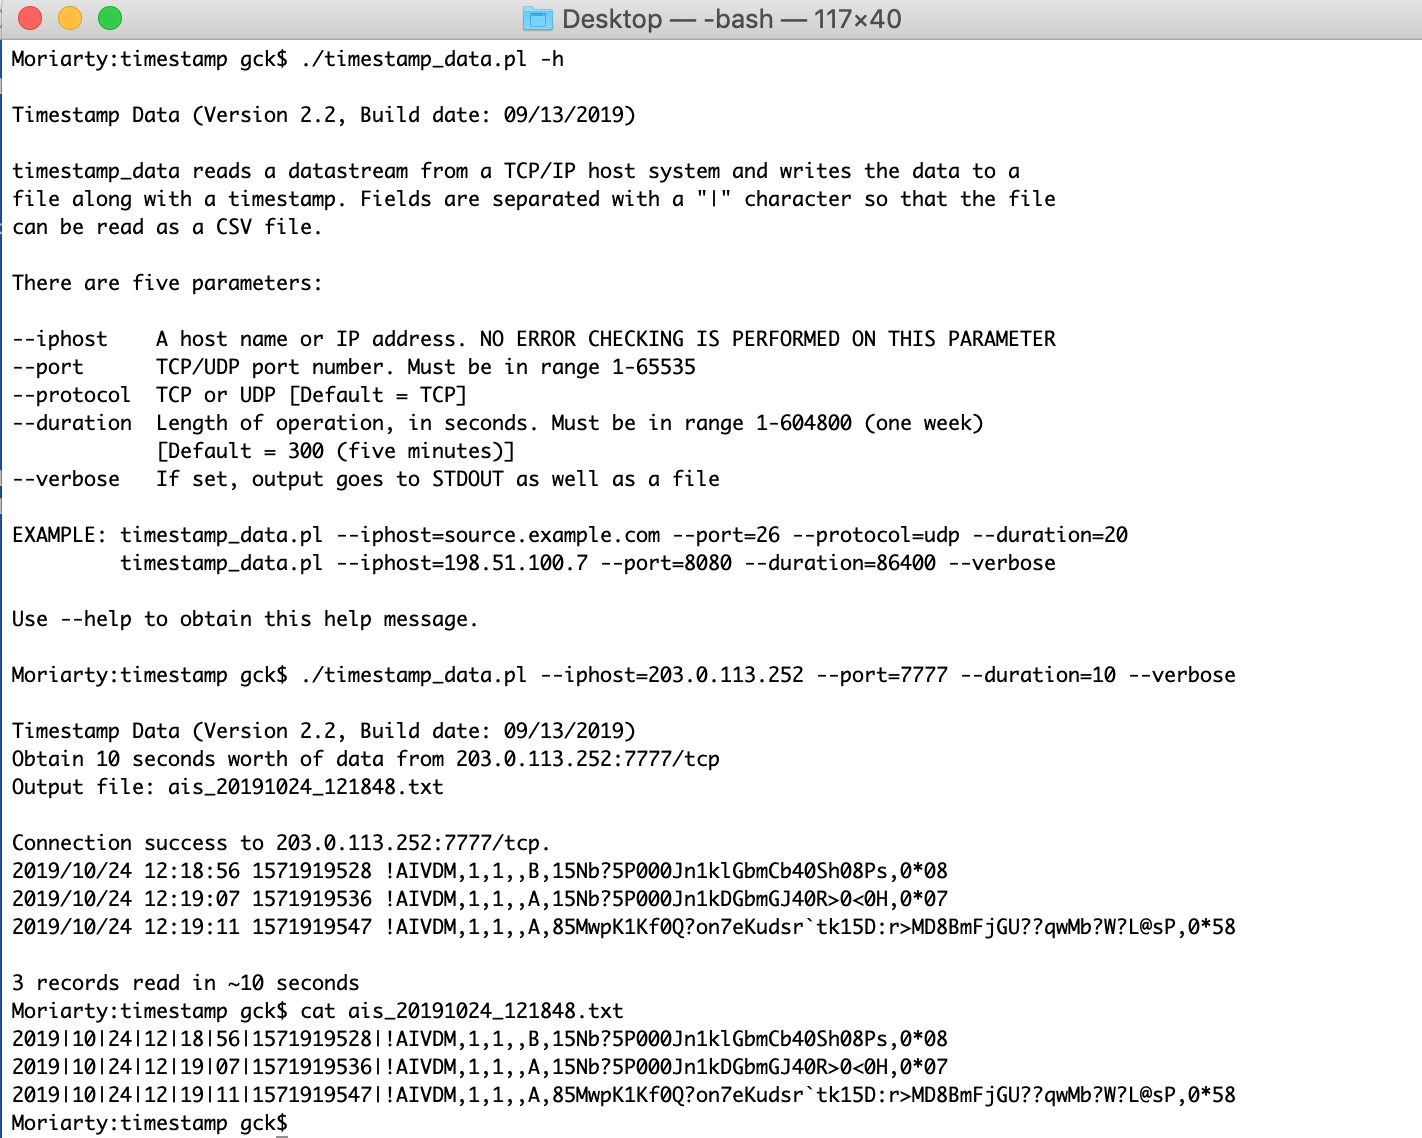
Finally... one of the problems that is immediately apparent from the raw output stream is that AIS lacks timestamp information. While OpenCPN displays a timestamp in the Debug Window, that is not part of the AIS message and, therefore, not a part of the raw data stream that can be captured. To remedy this, I wrote a small Perl program called timestamp_data that can connect to a TCP or UDP socket on a local or remote host, and read a data stream for a specified amount of time. Output is directed to a file complete with a human-readable and Unix epoch-formatted timestamp of when the data was received; fields in the file are delimited with a "pipe" (|) character. Users can, optionally, also see the data in real-time. The program can be found on my software page.
SIDENOTE: Sending data to OpenCPN
If you have a file filled with AIS messages, it is also possible to send that data to OpenCPN for display. First, you need to set up OpenCPN to listen on a TCP port rather than send. Just create a new OpenCPN connection on the port of your choice to address 0.0.0.0, as shown above, but check the box to "Receive input on this port."
There are a variety of methods with which to send the data to OpenCPN at this point. You could just transmit the entire file via netcat:
cat FILENAME | nc localhost PORTUsing the method above will work but all it does is dump the entire AIS message stream to OpenCPN at one time so you just see the last sentence transmitted by each vessel. If you want to slow things down a little, add a delay between the display of each line in the data file using some shell scripting:
     cat FILENAME | { while read line; do sleep 2; echo "$line" | nc localhost PORT ; done; }
     cat FILENAME | { while read line; do sleep 1; echo "$line" > /dev/tcp/localhost/PORT ; done; }
Again, the method above works but it puts in a fixed delay. If you used a tool that attaches a timestamp to your data or you otherwise have a data file with a timestamp on each message (e.g., you got the data using the timestamp_data tool above), you can replay the data in OpenCPN in relative real-time using another one of my tools, play_ais. This program only needs a character-delimited file where each record has a timestamp (in seconds) and valid AIS sentence; a short video about using this approach can be found on my Web page (NOTE: The program was called replay at the time that I made the video).
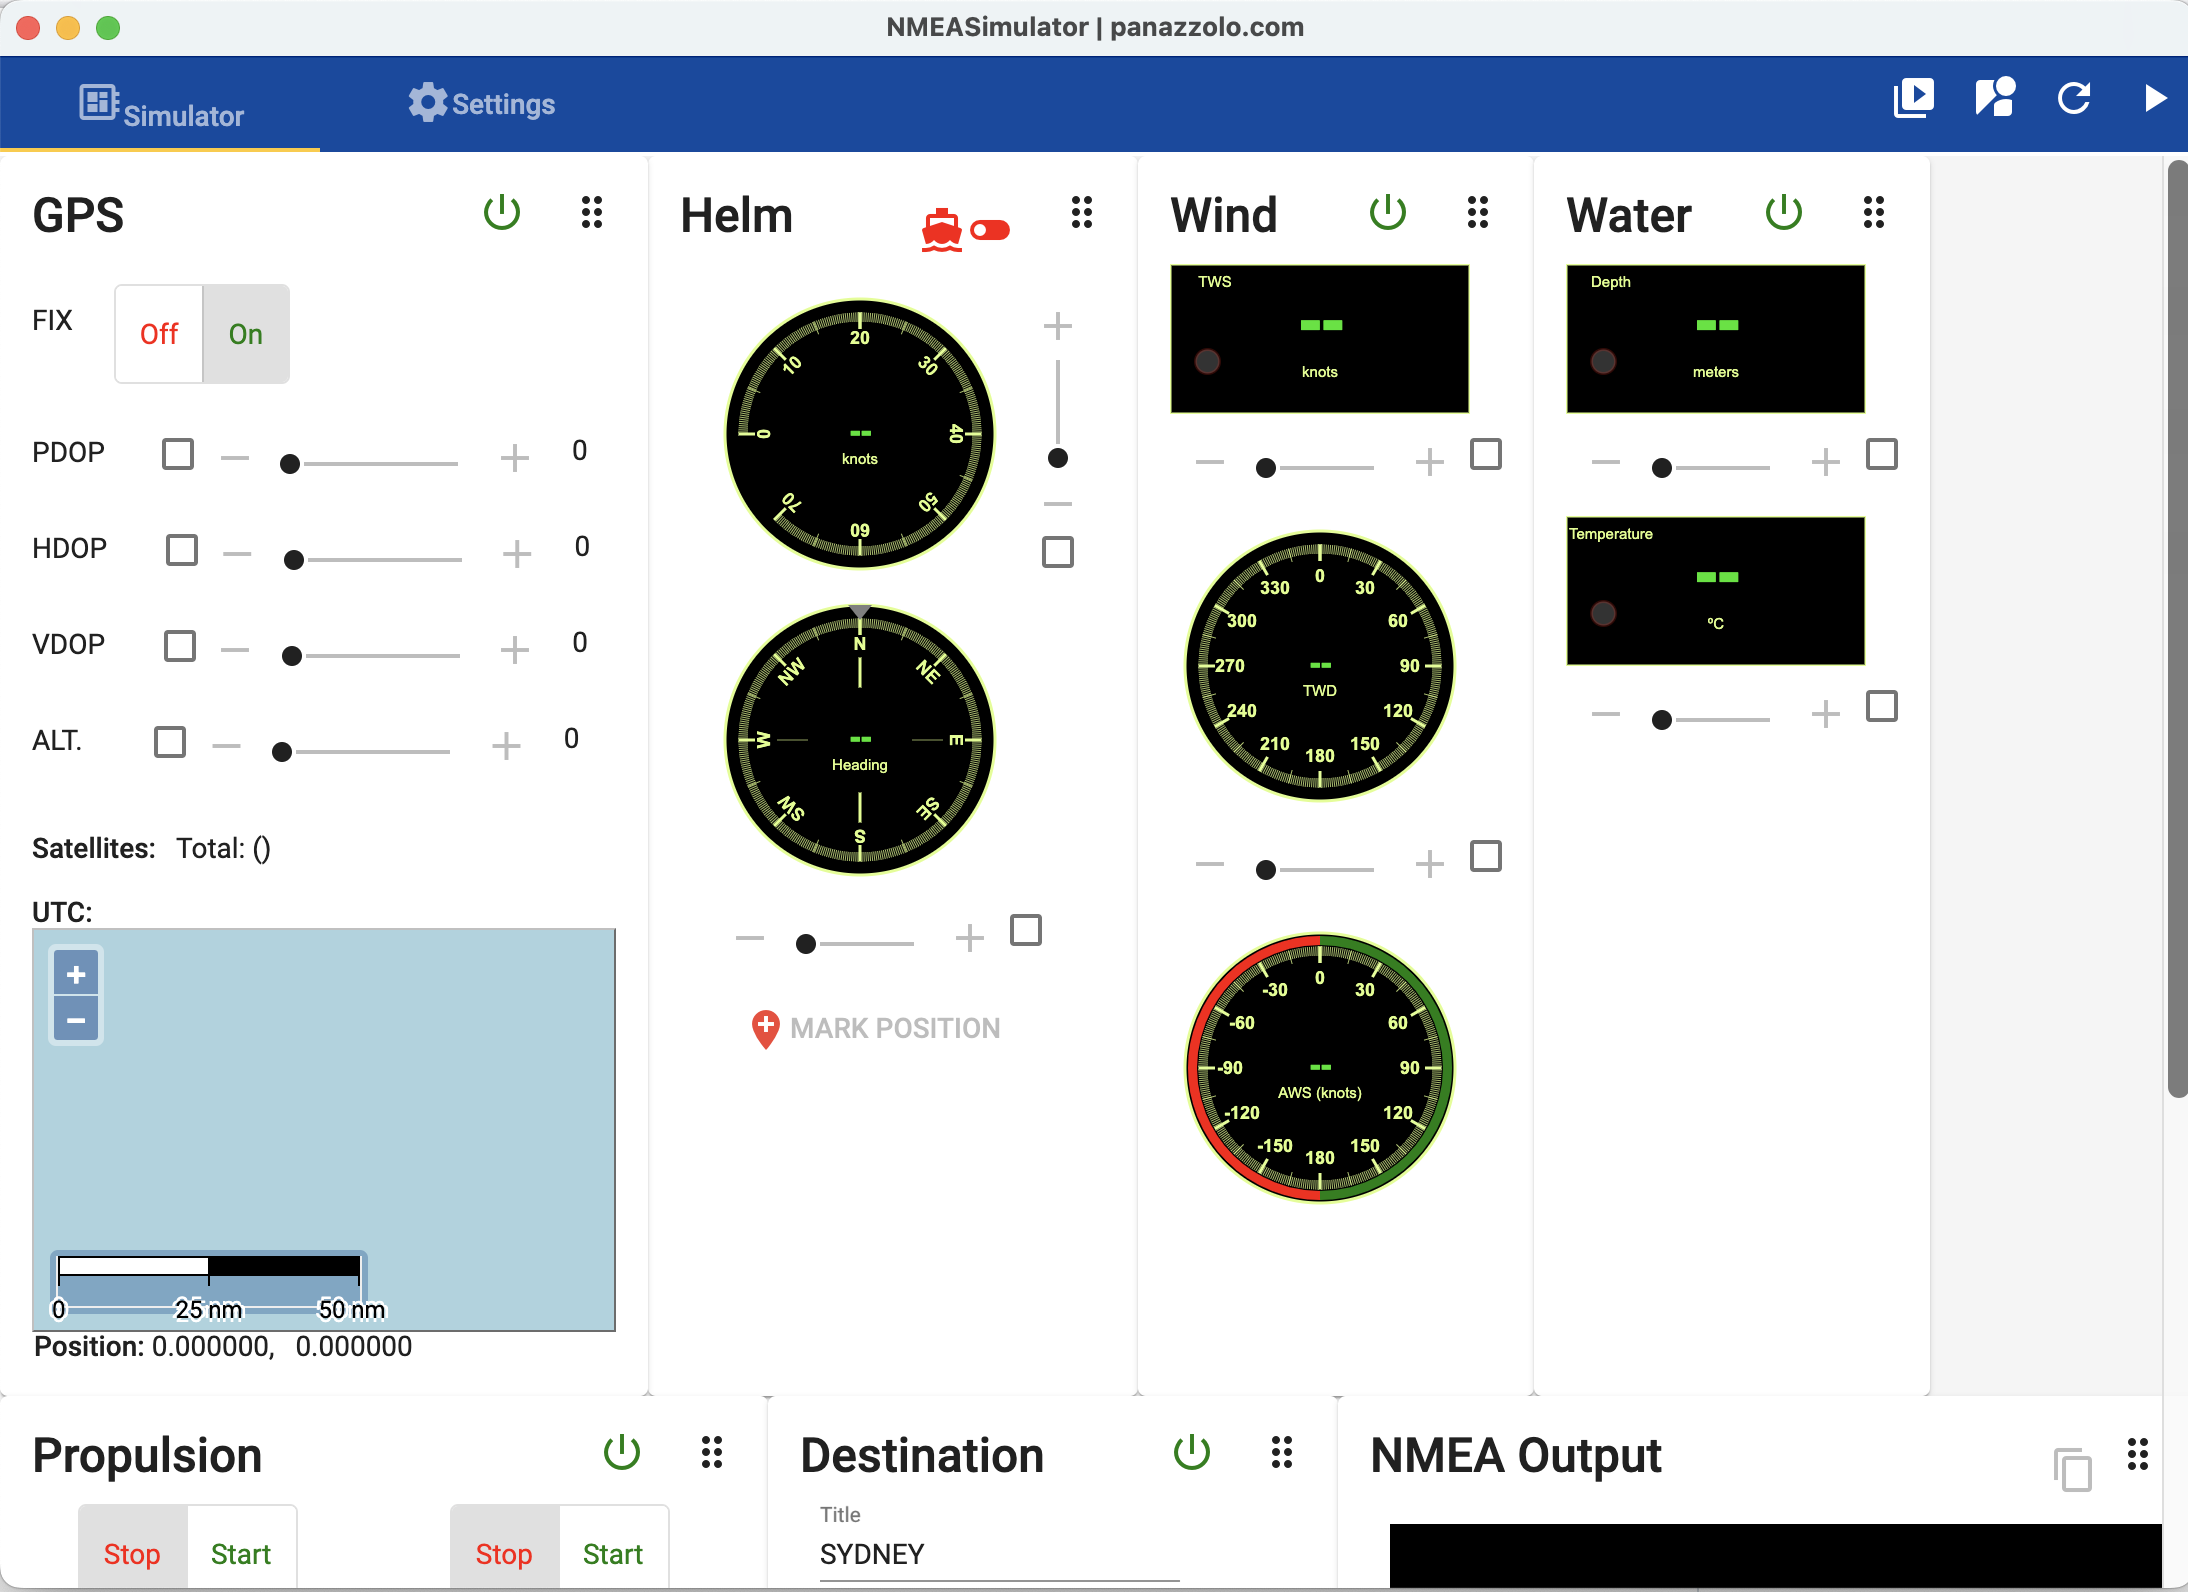
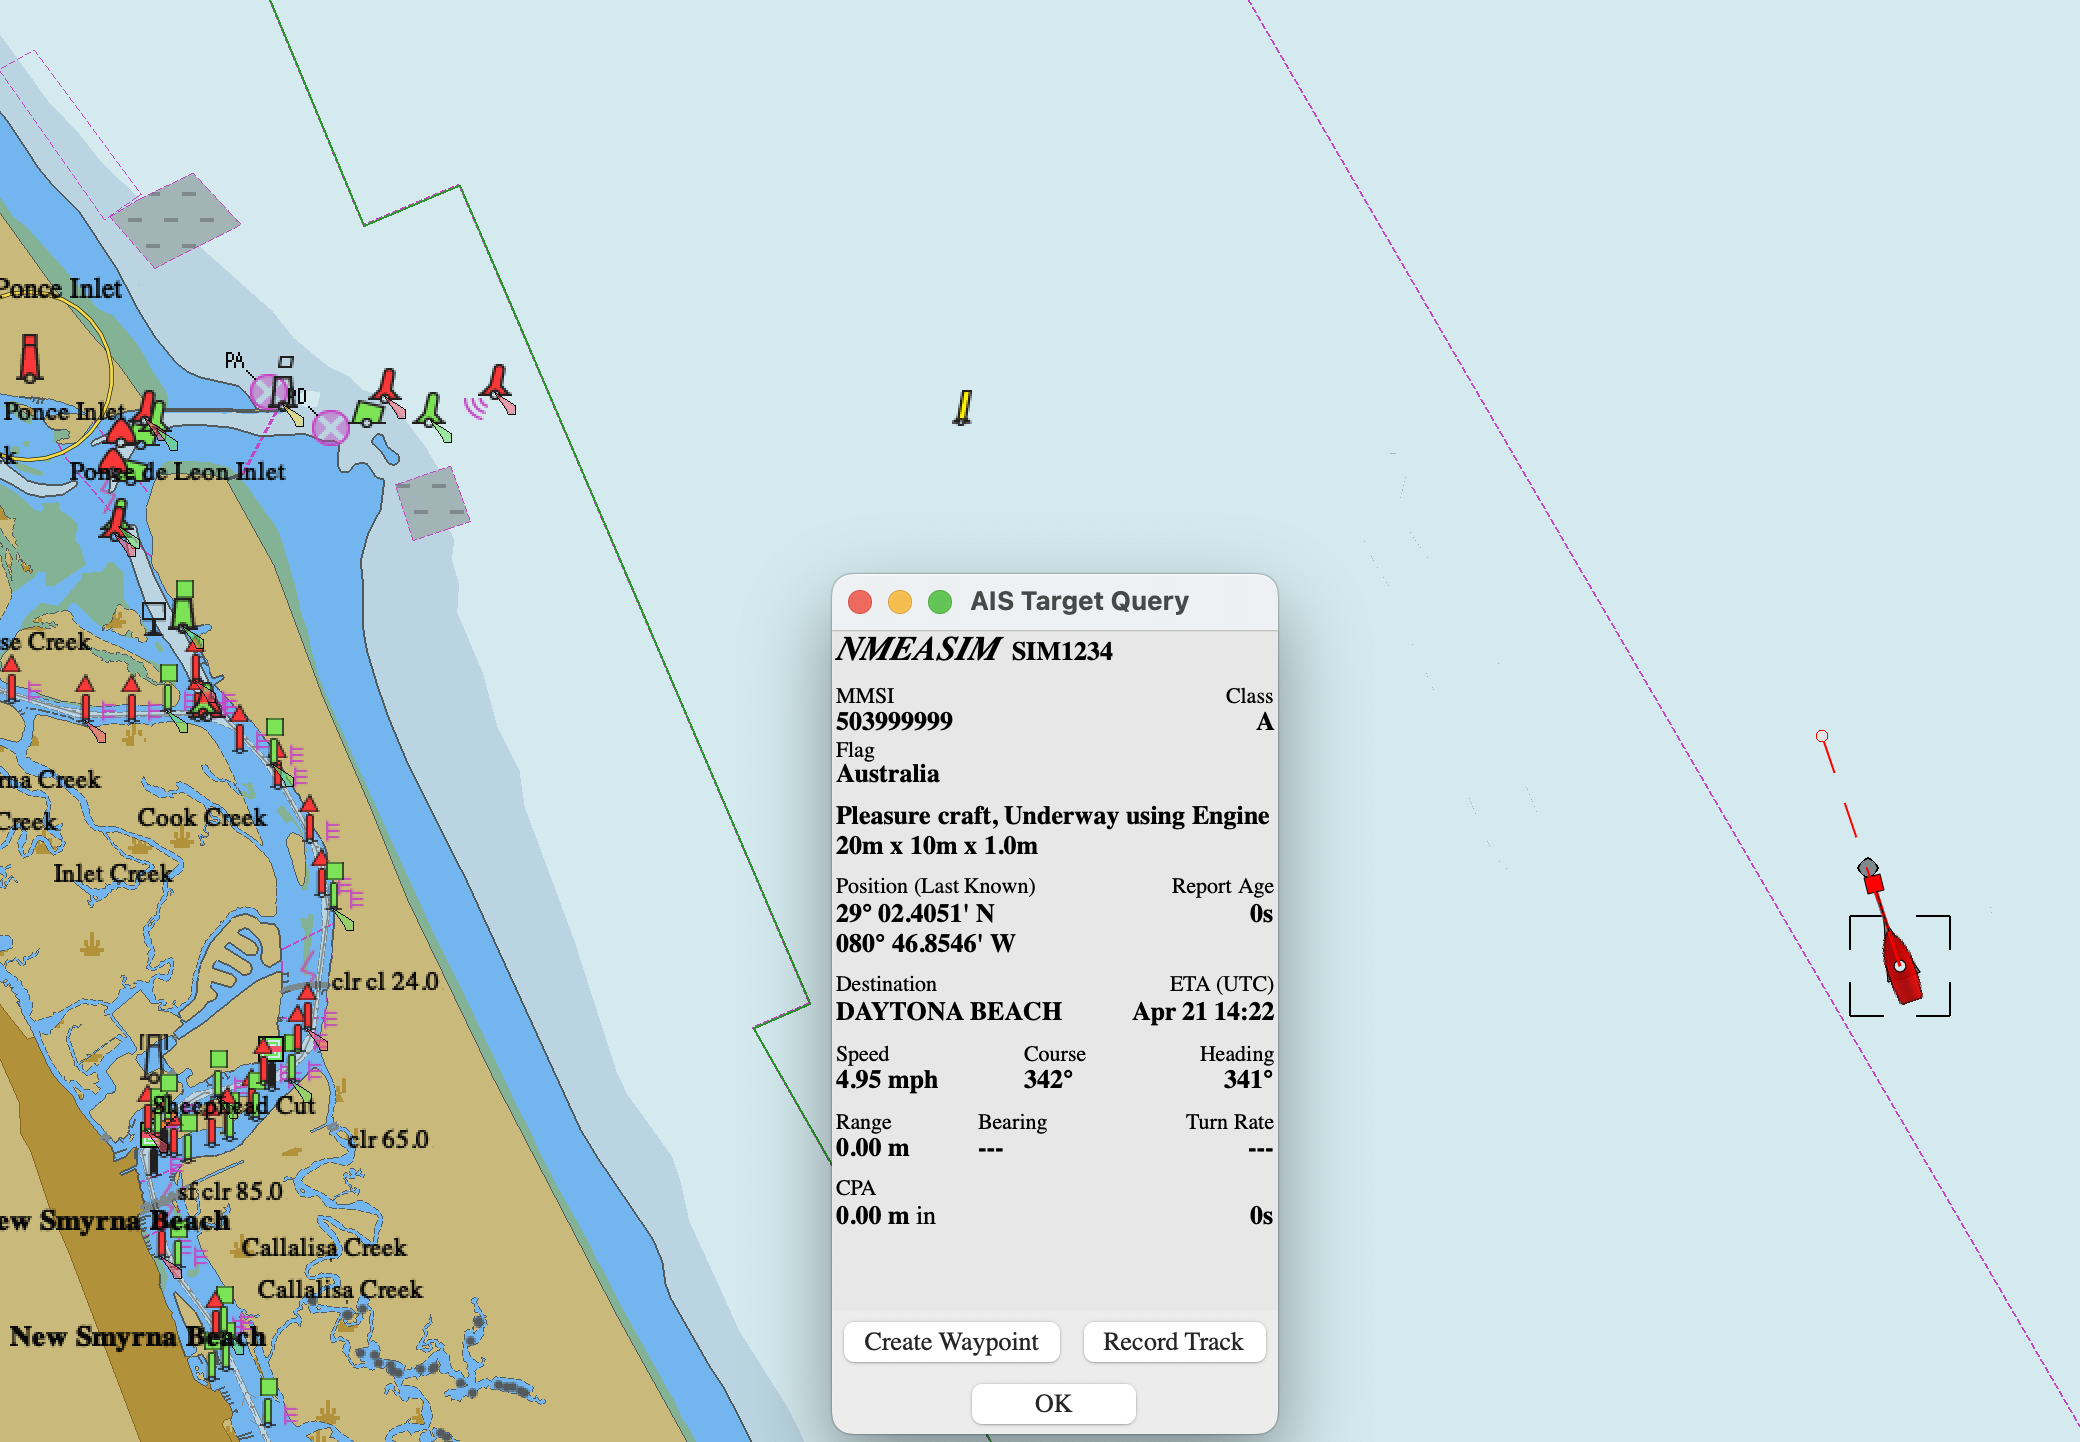
Another tool that is quite useful for AIS research is panaaj's NMEASimulator, an easy-to-use NMEA sentence generator for messages related to position, speed, and heading, among other items. The program, which replaces the Chrome-only plug-in, runs on Linux, MacOS, Raspberry Pi OS (armv7l), and Windows.
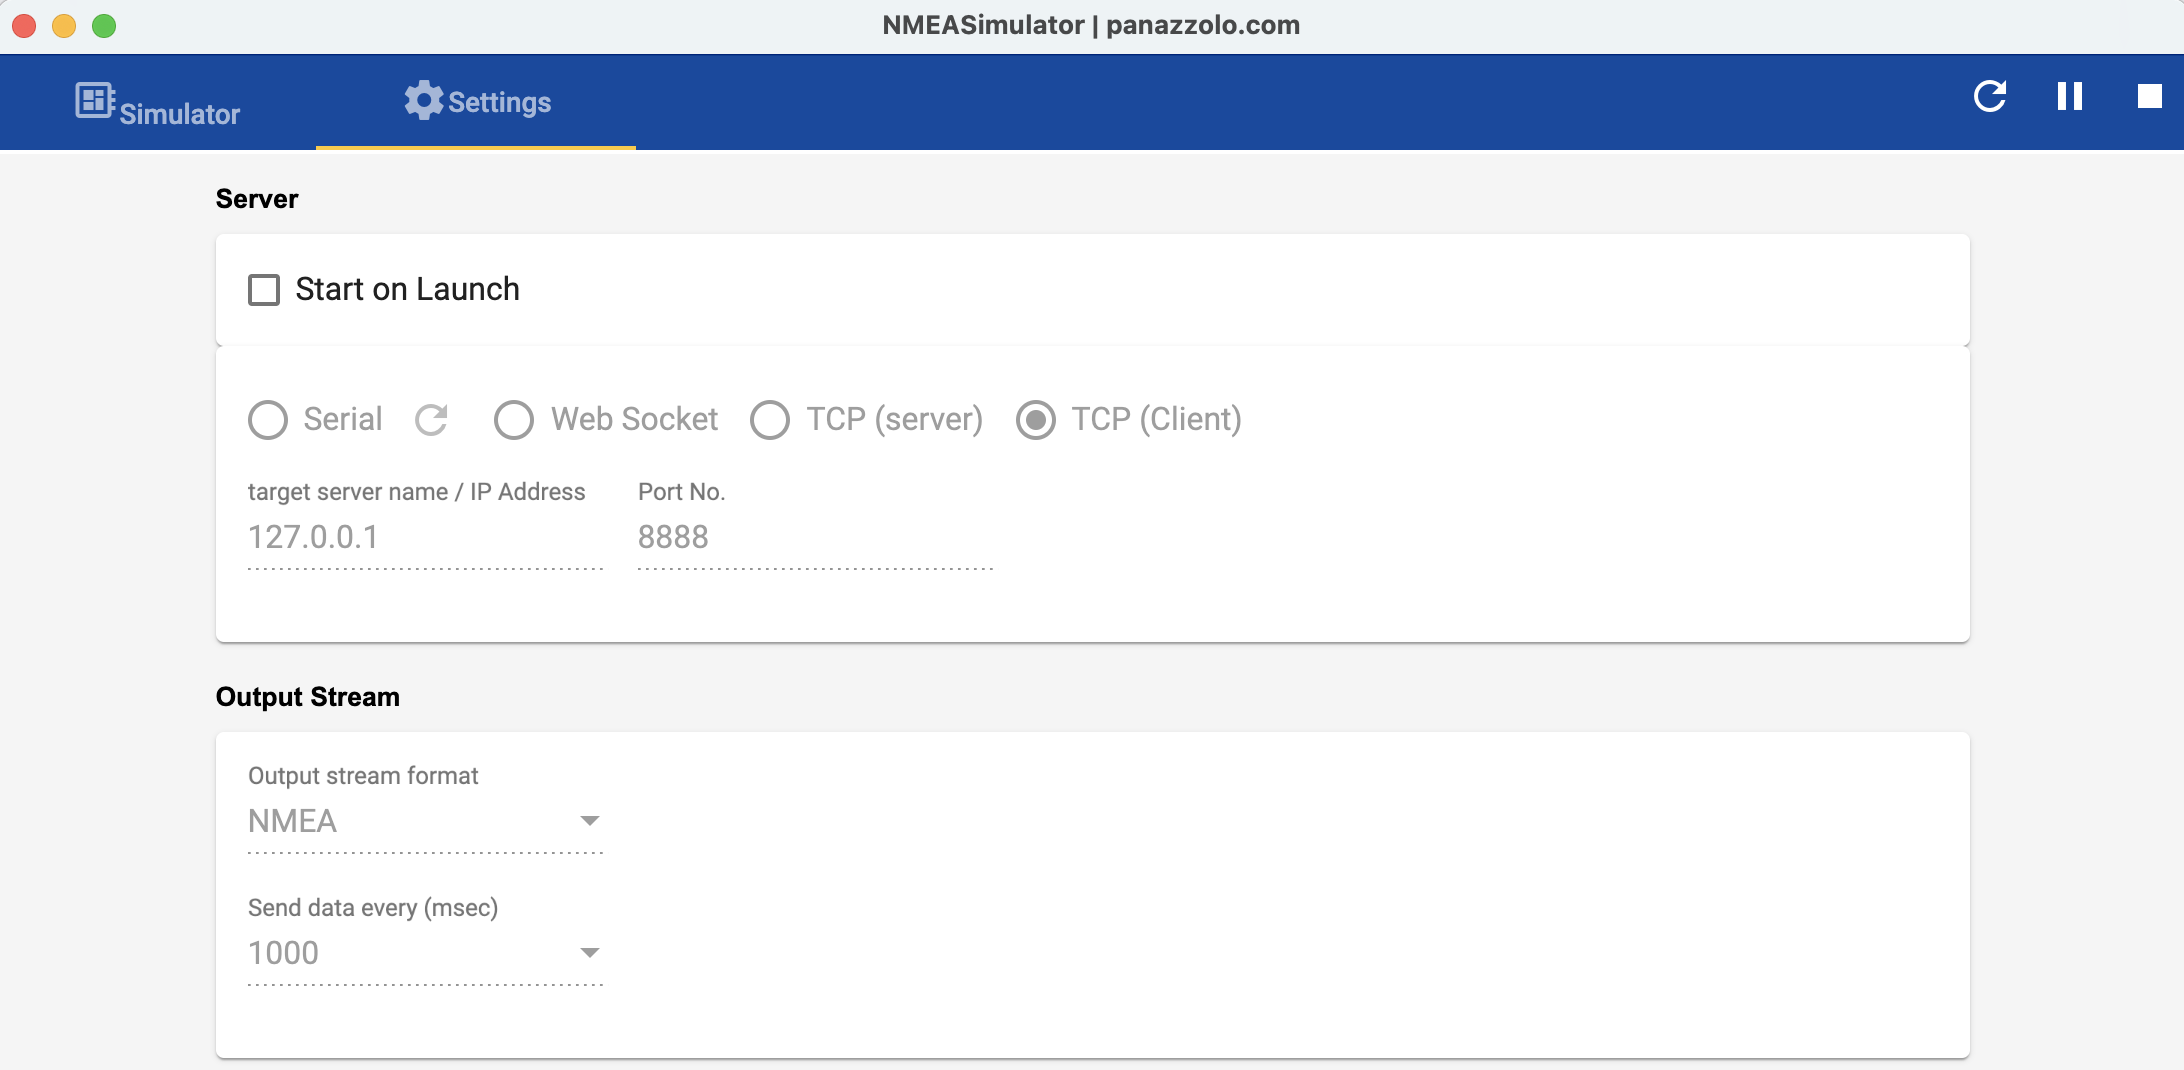
To send information to OpenCPN, you need the IP address and listening port. Enter this information into NMEASimulator by clicking on Options, Settings and selecting the Server tab. Be sure to click the Save button.
Start up OpenCPN and then click Start in NMEASimulator; simulated AIS data should now be displayed on OpenCPN.
Interpreting the Data
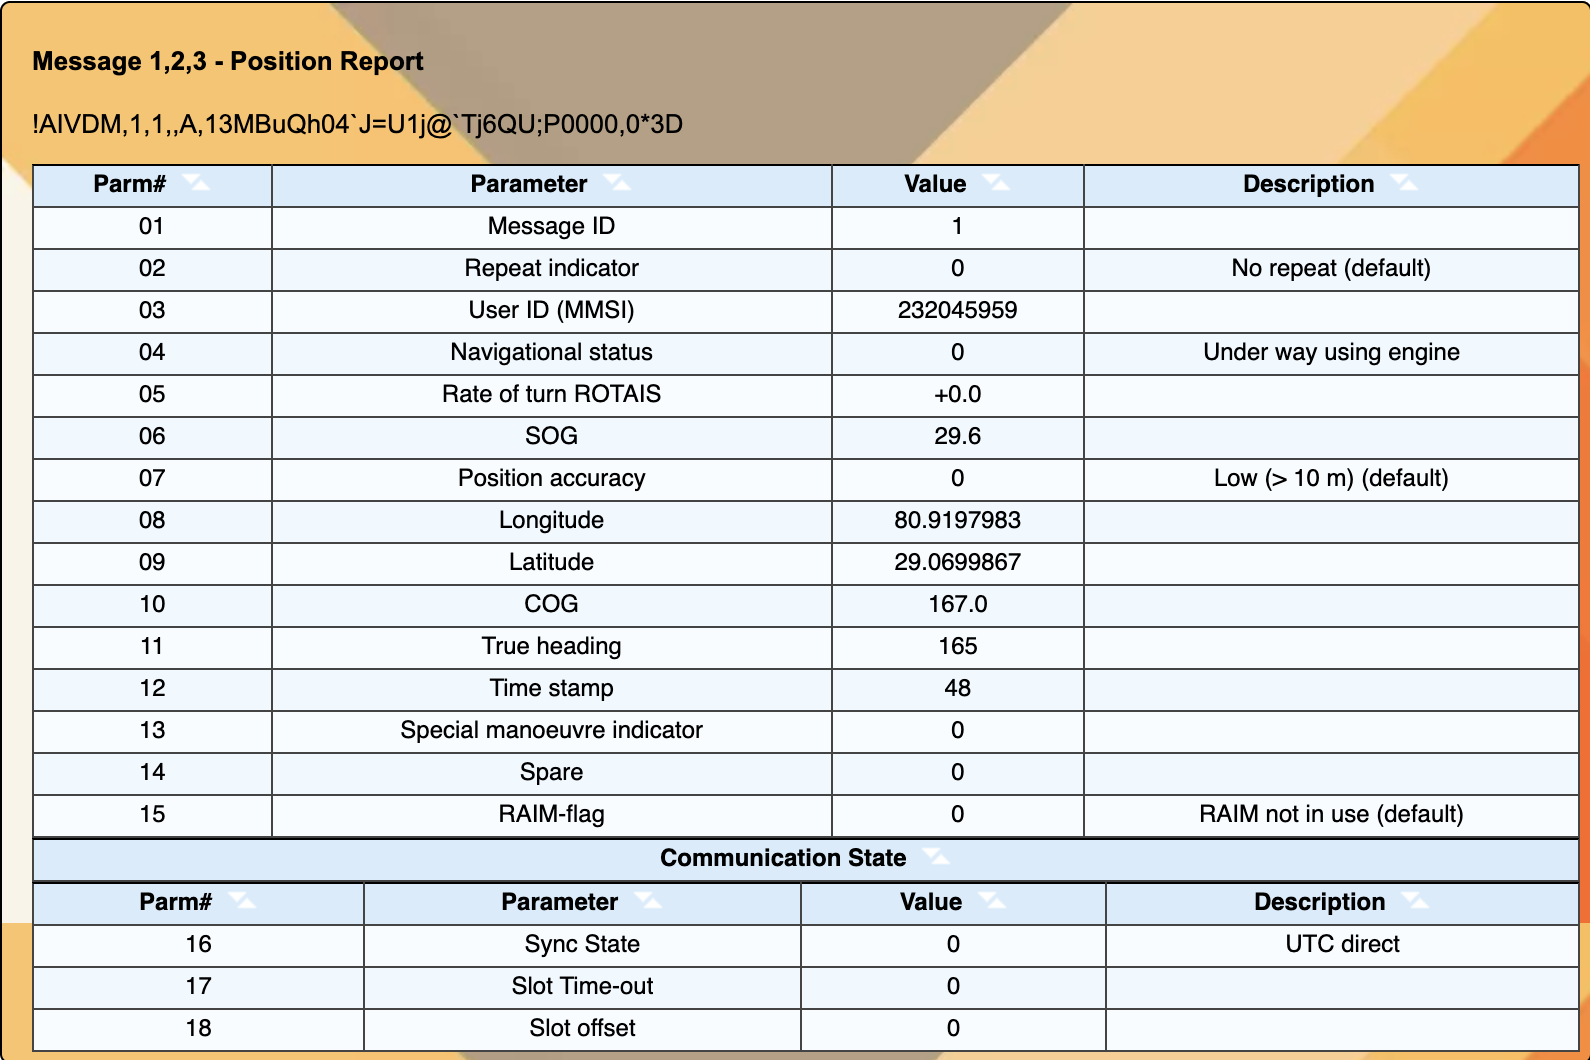
There are a variety of sources that will help you interpret the raw NMEA/ITU sentences that are transmitted over the air. The "AIVDM" sentences that AIS devices typically see are the NMEA 0183 AIS incoming transmissions (as opposed to AIVDO outgoing transmissions). Possibly the best online, open-source reference as to the details of the NMEA/ITU sentence content is Eric Raymond's AIVDM/AIVDO protocol decoding page.
There are also a number of AIS parsers online, where you can submit an NMEA sentence for interpretation, as shown below (from the Maritec Solutions online parser):
There are other AIS online parsers with a variety of capabilities, including:
- AIS online decoder (AGG Software)
- Online AIS Message Decoder (Thomas Borg Salling)
- AIS VDM/VDO Decoder (Maritec Solutions)
- AIVDM & AIVDO NMEA sentence decoder (RL.SE)
- AisDecoder (Neal Arundale)
A SMALL SIDENOTE: GCK's AIS Tools
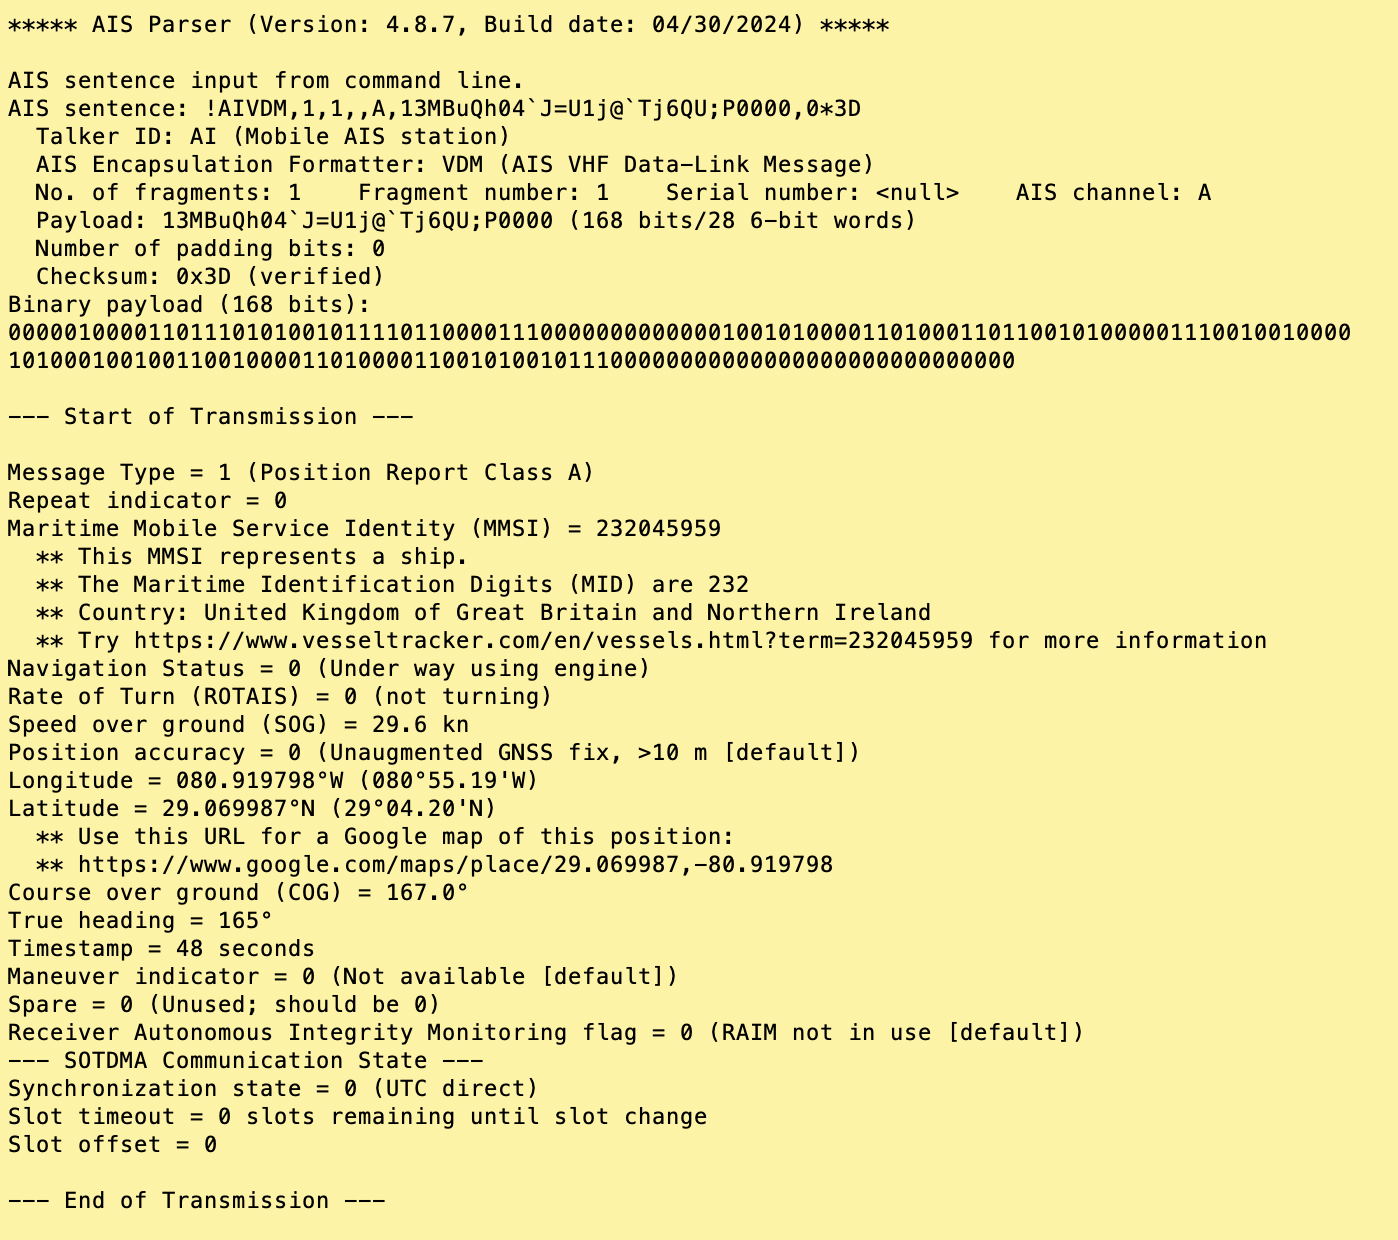
As mentioned earlier, my set of AIS tools (written in Perl) are available on my software page. These tools provide the ability to create AIS messages, and parse messages (as shown below), as well as capture AIS traffic in real time and replay AIS messages (as mentioned above).
To download my tools (or any other files) to the Raspberry Pi, go to my software page with the browser and download the desired ZIP file. To unzip the file, open a Terminal windows, navigate to the directory where the ZIP file was saved, and then use the unzip command to expand the file archive. A Perl interpreter is included in Raspberry Pi OS. Alternatively, you can use the wget command to download files.
Here is an example. Suppose you want to download the ais_tools_latest.zip file from my Web site and put it into a directory that you will create named AIS on the Raspberry Pi. You can do this with following commands:
     mkdir AIS
     cd AIS
     wget www.garykessler.net/software/ais_tools_latest.zip
     unzip ais_tools_latest.zip
If you are looking for real AIS data for research, testing, or curiosity, check out:
- AISHub, an AIS data sharing and vessel tracking site
- AIS data from the area of Daytona Beach/Ponce de Leon Inlet, Florida can be found at http://ssia-ais.erau.edu/; for a live data feed, telnet or netcat to port 4000 at ssia-ais.erau.edu
- The Norwegian Coastal Administration offers real-time AIS data at IP address 153.44.253.27, port 5631 or https://kart.kystverket.no/share/9220e0e277e4
- Spire Global also has some historical AIS data that can be made available upon request.
And, finally... if you are working with NMEA 2000 binary data, take a look at the CANboat project. Also, aisstream.io provides a websocket API for real-time AIS data acquisition.
COPYRIGHT NOTICE
All information on this page © 2019-, Gary C. Kessler. Permission to use the material here is extended to any of this page's visitors, as long as appropriate attribution is provided and the information is not altered in any way without express written permission of the author.